

Is The Shutter Active When Shooting Video On A Mirrorless Camera
Finding the Universe contains affiliate links, meaning if you brand a buy through these links, we may earn a commission at no extra price to y'all.
And so y'all're the proud owner of a new mirrorless camera. Awesome! Mirrorless cameras are a wonderful bit of photography kit, with a number of advantages over other types of photographic camera. They're as well i of the best cameras with which to larn photography on, because you lot can see the changes you make to various settings in real fourth dimension.
Nevertheless, a mirrorless camera is a complicated piece of equipment. As such, yous definitely demand to spend a bit of time learning how to use it properly so you tin unlock its total potential.
Which is where I come in. I've been taking photos for over thirty years with a broad range of cameras, from a film SLR through to compact, mirrorless, and DSLR cameras. I likewise teach an online photography grade, pb photograph workshops, and requite talks on photography effectually the world.
So those are my qualifications.
Today, I'm going to share with you all the key things you lot demand to know in society to become the well-nigh out of your new mirrorless camera. I'm going to tell yous all the major functions information technology has, the settings yous need to main, explain how to become great photos with your new photographic camera, and then go over some tips for caring and looking later on your new investment.
This guide is written on the assumption that you lot have no previous photography experience, so nosotros will offset with the basics and piece of work our way frontwards. Of course, if y'all have photography feel that's great, however, refreshing yourself on the basics never hurts in my opinion.
At this point, I would like to quickly say that photography is not a elementary field of study. It can take time to grasp many of the concepts, and practice with your gear is the best way to get a handle on it. Reading a guide like this is a great starting point, only I urge you lot to get out at that place and accept photos as much equally you tin can.
Digital movie doesn't cost anything, and as you lot use your camera more and more than the diverse settings and features will all start to brand more sense. Please don't go as well frustrated if y'all feel overwhelmed. Photography is complicated, and like any skill, it takes time to main. Perseverance and patience are key!
Feel costless to bookmark this folio and come dorsum to it for reference equally your photography journey progresses. Now, let's starting time with the basics of what a mirrorless camera actually is.
Table of Contents
What is a Mirrorless Camera?
A mirrorless camera is a type of digital camera. At that place are a number of types of digital cameras on the market, such as DSLR cameras, compact cameras and fifty-fifty smartphone cameras.
These cameras actually have more than in mutual with each other than differences. In fact, the bones principle of how a camera works hasn't changed a great deal since photography was invented.
At its cadre, a camera is a device which is used to record low-cal data, to create an output we telephone call a photo. The medium for recording light was initially a chemically photosensitive slice of film, only that has been replaced by a digital sensor in near modern cameras.
All types of digital cameras take light from a scene, focus it through a lens, and tape it onto a sensor.
The differences betwixt the various types of digital cameras are largely around some of the components that make up the photographic camera. Key differences include:
- the size of the sensor inside the camera. Smaller cameras usually have smaller sensors
- the size of the aperture inside the lens
- the level of manual control a user has
- whether or not it supports different lenses or non
A mirrorless photographic camera is very similar to a DSLR camera in near regards. Most mirrorless cameras take relatively big sensors, produce high quality images, have full manual controls, and have interchangeable lenses.
The difference is that a mirrorless camera, as the name suggests, does non take a mirror inside information technology. In a DSLR, the mirror is used to redirect the light passing through the lens to the optical viewfinder. This ways the lensman sees the actual scene when looking through the viewfinder.
A mirrorless camera does not have this mirror, and every bit such, information technology does not take an optical viewfinder. The image that the photographer uses to compose the shot is either displayed on the screen on the dorsum of the photographic camera, or on some mirrorless cameras, in the electronic viewfinder.
In both of these cases, the image is the effect of the light hitting the camera sensor, being processed past the cameras electronics, and then output to the screen as a digital image.
This is actually the aforementioned with smartphones and near compact cameras, which also practice not accept a mirror within. However, considering the mirrorless camera arose every bit a direct competitor to the DSLR, and the cardinal deviation is the lack of mirror, the name stuck.
Mirrorless cameras have a number of advantages over DSLR cameras. They tend to be lighter and smaller whilst producing like paradigm quality. They are easier to apply in many cases considering what you run across on the screen is exactly the image you get when yous press the shutter button.
Plus they take the aforementioned advantages that a DSLR camera has, including interchangeable lenses, support for RAW shooting, and full manual controls.
The master disadvantage is cost, as most mirrorless cameras tend to be a little scrap more expensive than their equivalent DSLR product. There is as well a very slight filibuster between reality and the image seen on screen due to the processing. This isn't noticeable or fifty-fifty a factor for nearly photographers, notwithstanding loftier terminate sports photographers have largely stuck with DSLR cameras for this reason.
In addition, there is all the same a wider selection of lenses for DSLR cameras as they have been available for longer, and battery life on a DSLR is improve than on a mirrorless camera.
Mirrorless Photographic camera Controls: A Guide to Using Your Mirrorless Photographic camera
When you lot accept a mirrorless camera out of the box, you will probably notice that it has a lot of buttons and controls, with a range of obscure labels and markings.
This can be a bit overwhelming, and yous might be tempted to get out information technology in machine fashion as a result. This is definitely a natural reaction. However, to get the almost out of your photographic camera, it is definitely worth learning what at least some of the buttons do.
The skillful news is that once you have done this with i camera, you can transfer your knowledge to other cameras which are all fairly similar.
I am now going to go through the major controls, features, and buttons that most mirrorless camera accept. The exact controls, features and naming conventions might vary from camera to photographic camera, but this should cover most of the primal elements y'all should be looking to master on your new camera.
Shutter Release
Probably the most obvious button on your camera, the shutter release is the button yous press to take a photo. This will usually be located at the top right of the camera, to exist operated past the alphabetize finger on your right hand.
Left handed photographers are out of luck, as far as I know there has never been a left handed camera design with the shutter button placed for left handed use.

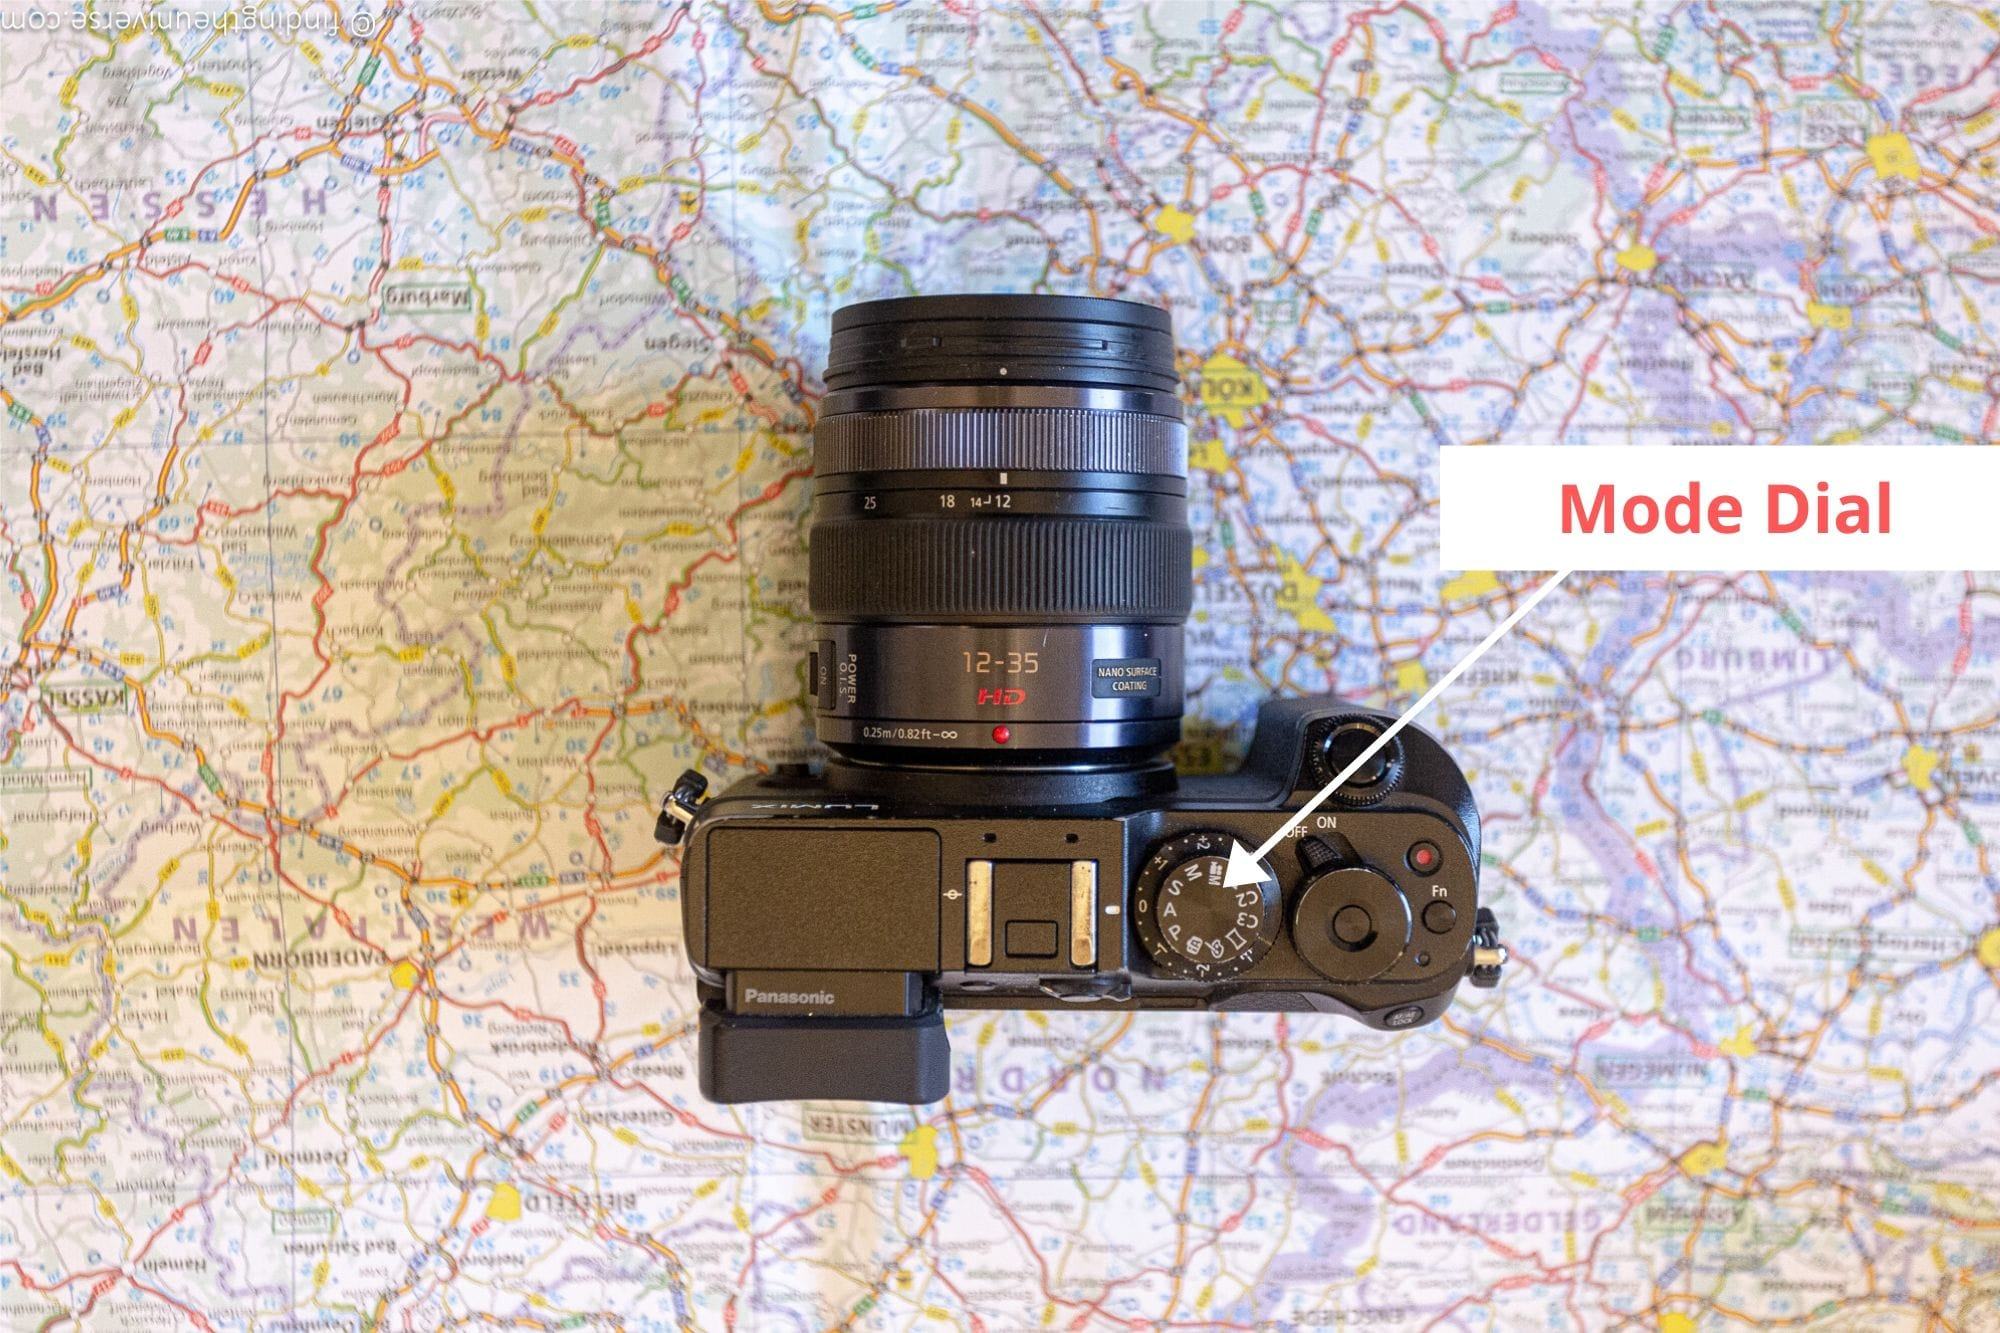
Way Dial
Similar DSLR cameras and some advanced meaty cameras, a mirrorless camera has a range of modes that you tin operate it in. These modes are generally used to define how much degree of manual control you lot want over the photographic camera.
They will range from full Automatic modes where the camera does everything for you, through to a fully transmission mode where you are in accuse of everything.
To change the mode the camera is in, yous just rotate the mode punch to the mode you desire. This will instantly change the way the camera is in, and the new mode is normally displayed on screen as well when you change operating fashion.
The exact modes bachelor will vary by camera model, but should be similar to the following:
- Auto.This is the default way that most cameras will come prepare to. In Automatic mode, the photographic camera volition handle everything for you, including setting the shutter speed, aperture, and ISO. It will also often pick the focus point, and may fire the flash if you accept one. Auto is designed so you just have to point the camera at your subject and press the shutter button.
- Additional Machine modes. Too as the default auto mode, the camera may also come with a number of additional motorcar modes, which are unremarkably referred to equally "scene" modes. For example, at that place may be a mural auto mode, a portrait auto manner, a night scene mode, and a macro automobile mode. These modes exist to requite the photographic camera a inkling equally to what you are taking a moving picture of, then it can adjust the settings for you.
- P way. "P" mode stands for Program Auto. This is basically a slightly advanced version of automatic fashion, where the camera lets yous make some adjustments to the shot. These include increasing and decreasing the brightness of the image with exposure compensation, adjusting the ISO, and changing the white balance. It'southward a stepping stone to the more manual controls, merely I'd suggest ignoring it and moving to i of the modes below instead.
- "A" or "AV" mode. This is discontinuity priority style. Aperture priority lets y'all fix the aperture, and and so the camera will evaluate the light in the scene, and set the appropriate shutter. You tin also adjust the ISO in this mode, too equally adjust the brightness using exposure compensation. Aperture allows yous to control depth of field, and this way works well for both portrait shots and landscapes.
- "Due south", "T", or "Television receiver" way. This is the shutter priority mode. Shutter priority lets you set the shutter, and and then the camera will evaluate the light in the scene and ready the appropriate aperture. You can as well adjust the ISO. This mode is essentially the same as discontinuity priority, except y'all control the shutter. You can too suit the brightness using exposure compensation. Shutter priority is great for when you want to control motion in the shot, such as freezing a fast moving subject.
- "M". This is full manual mode. In this mode you control the discontinuity, shutter speed, and ISO. The camera will use the exposure meter to tell you lot if you lot are under or over exposing the paradigm, but information technology won't terminate you from doing either. You can't use exposure compensation in this manner because you take full control over the exposure. Yous can as well suit ISO in this way.
Although out of the box, you may want to beginning merely shooting in Auto to get a feel for the camera, I would recommend that you aim to eventually shoot in aperture priority, shutter priority or manual modes. These modes give you lot the most command over the last look of the image and the limerick.
Aperture priority lets you lot control the discontinuity, which adjusts the depth of field of the shot. This works well for portraits and landscapes, or whatsoever shot where the depth of field is a key part of the composition.
Shutter priority for me is all about controlling how movement appears in your shot. If you want to testify some motion blur, you'd utilise a tiresome shutter speed. If y'all want to freeze the action of a fast moving subject, you'd employ a high shutter speed.
Exactly how aperture, shutter speed, and ISO piece of work together to create a correctly exposed concluding epitome is a concept known as the exposure triangle. This is a bit across the scope of this post, but I have written a detailed guide to the exposure triangle which I think yous volition notice useful.
Finally, don't worry too much about jumping all the way to manual fashion. Whilst manual mode is useful for specific photography situations similar long exposure photography or astrophotography, I more often than not notice that for my photography needs, I work 90% of the time in either aperture priority or shutter priority mode.
These modes let me command a specific compositional element of the scene, like depth of field or movement, whilst non having to worry also much virtually the other settings at the gamble of missing the shot.
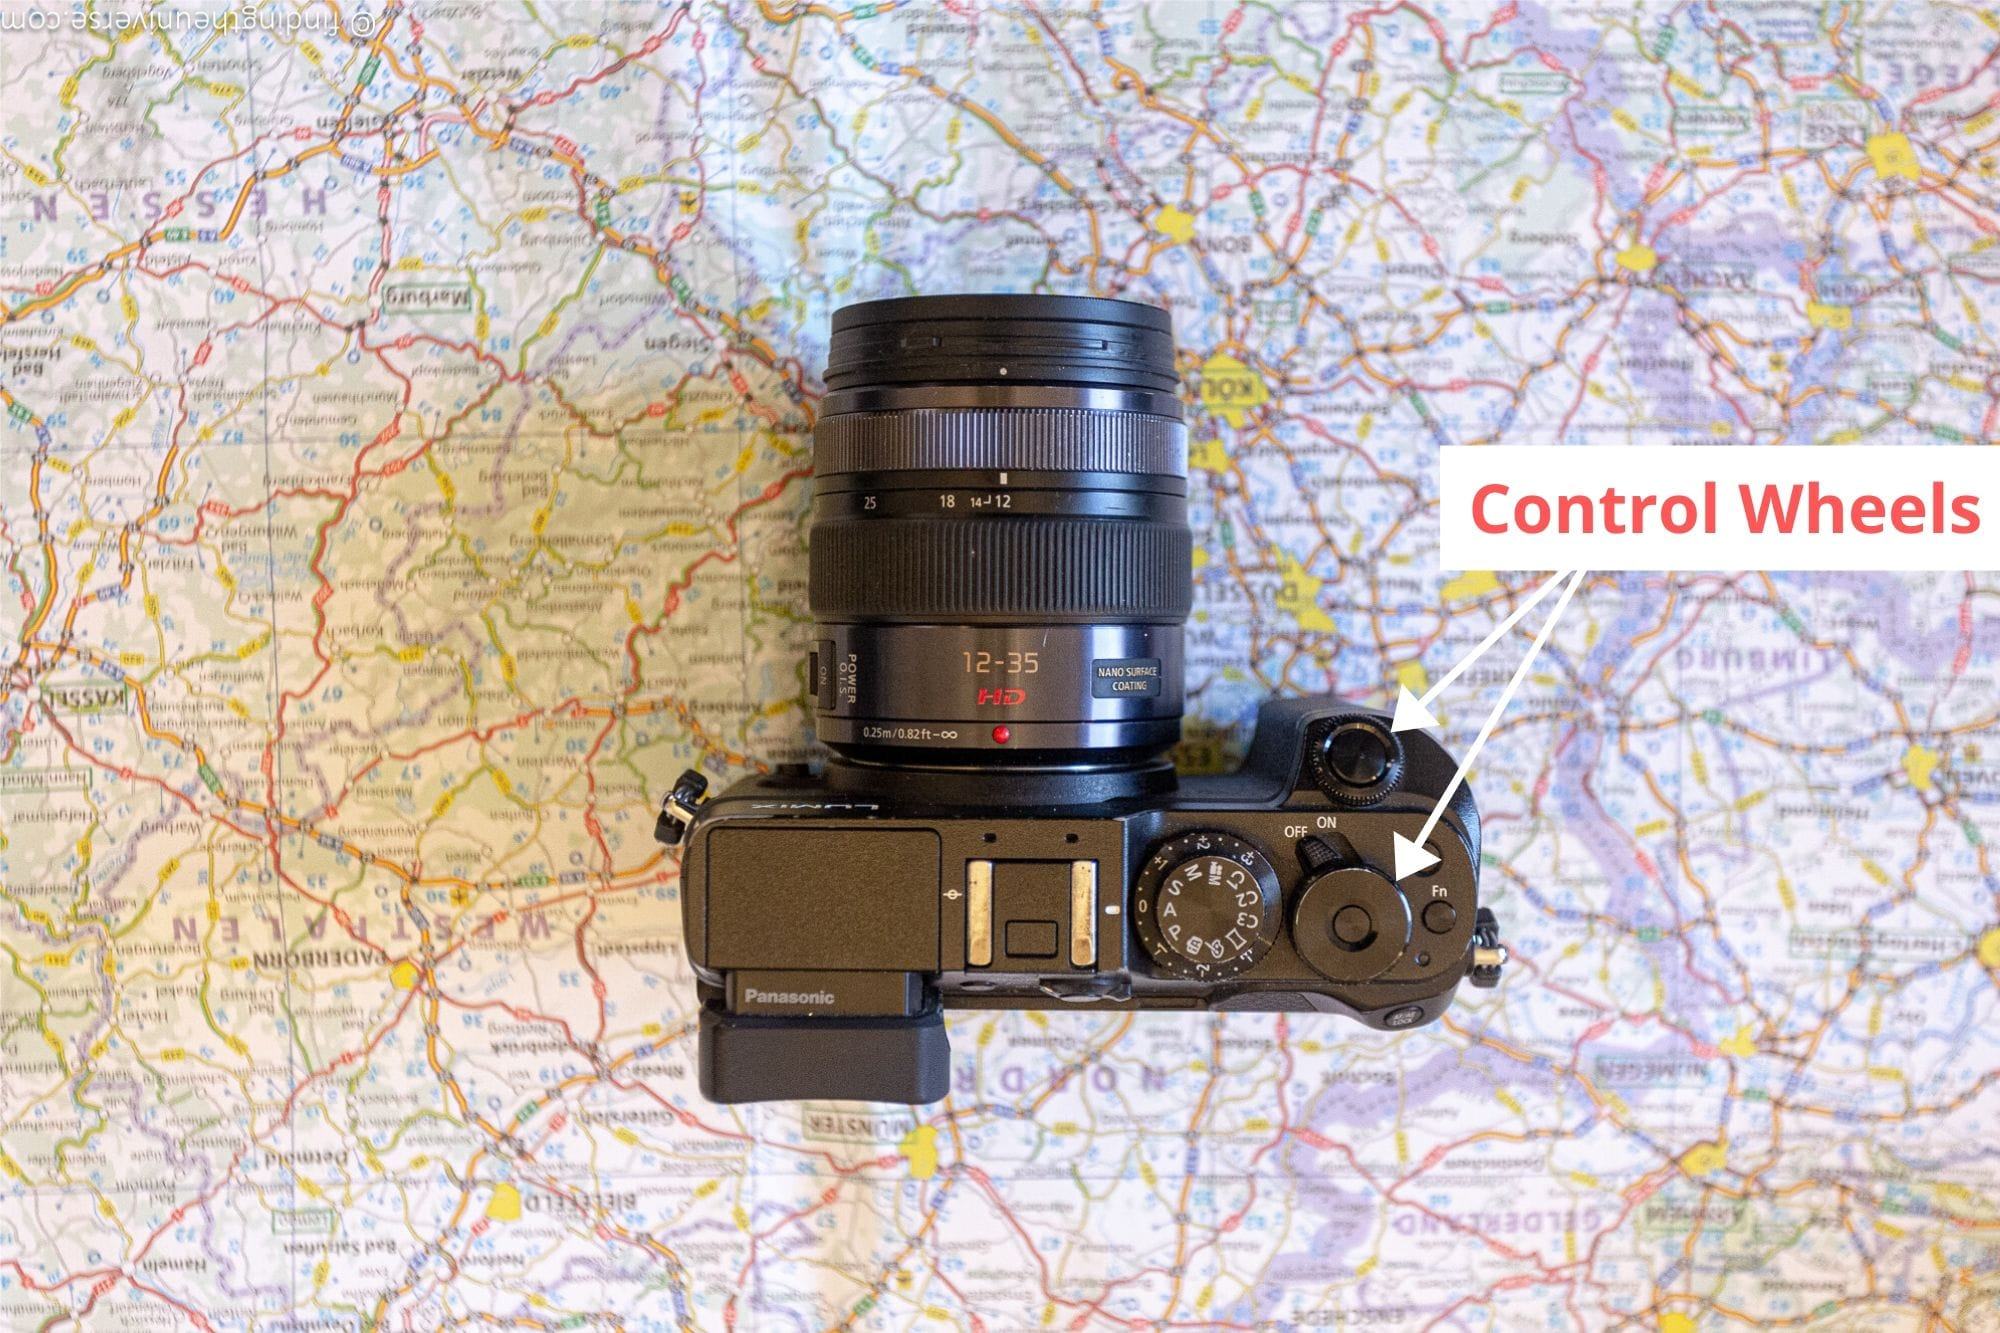
Control Wheel
Depending on the camera you have, you will have one or more than command wheels to play with. These may exist located in different places on the photographic camera. A mutual place for a control wheel is most the shutter button, so it can be easily adjusted with your index finger.
Control wheels tin can likewise oftentimes exist found on the back of the camera or on the top of the camera. For case, on my Lumix GX8 mirrorless photographic camera, in that location's a command wheel effectually the shutter push button, and a control wheel on the top of the camera behind the shutter button.
Usually, a control wheel is used to conform a specific setting. What information technology changes will vary depending on the mode the camera is in.
In aperture priority fashion for example, the control cycle can usually be used to increment or decrease the discontinuity. In shutter priority manner, the control cycle will usually increment or subtract the shutter speed.
If your camera has multiple control wheels, then in manual way i cycle will suit the aperture, and the other will adjust shutter speed.
Depending on your photographic camera, you might be able to change exactly what each control bicycle changes. For example, yous might be able to set it up to manage exposure compensation, ISO settings, white residue settings, and so on.
The default settings will ordinarily be fine, but every photographer is different, so do feel complimentary to suit these to your needs as you progress on your photography journeying.
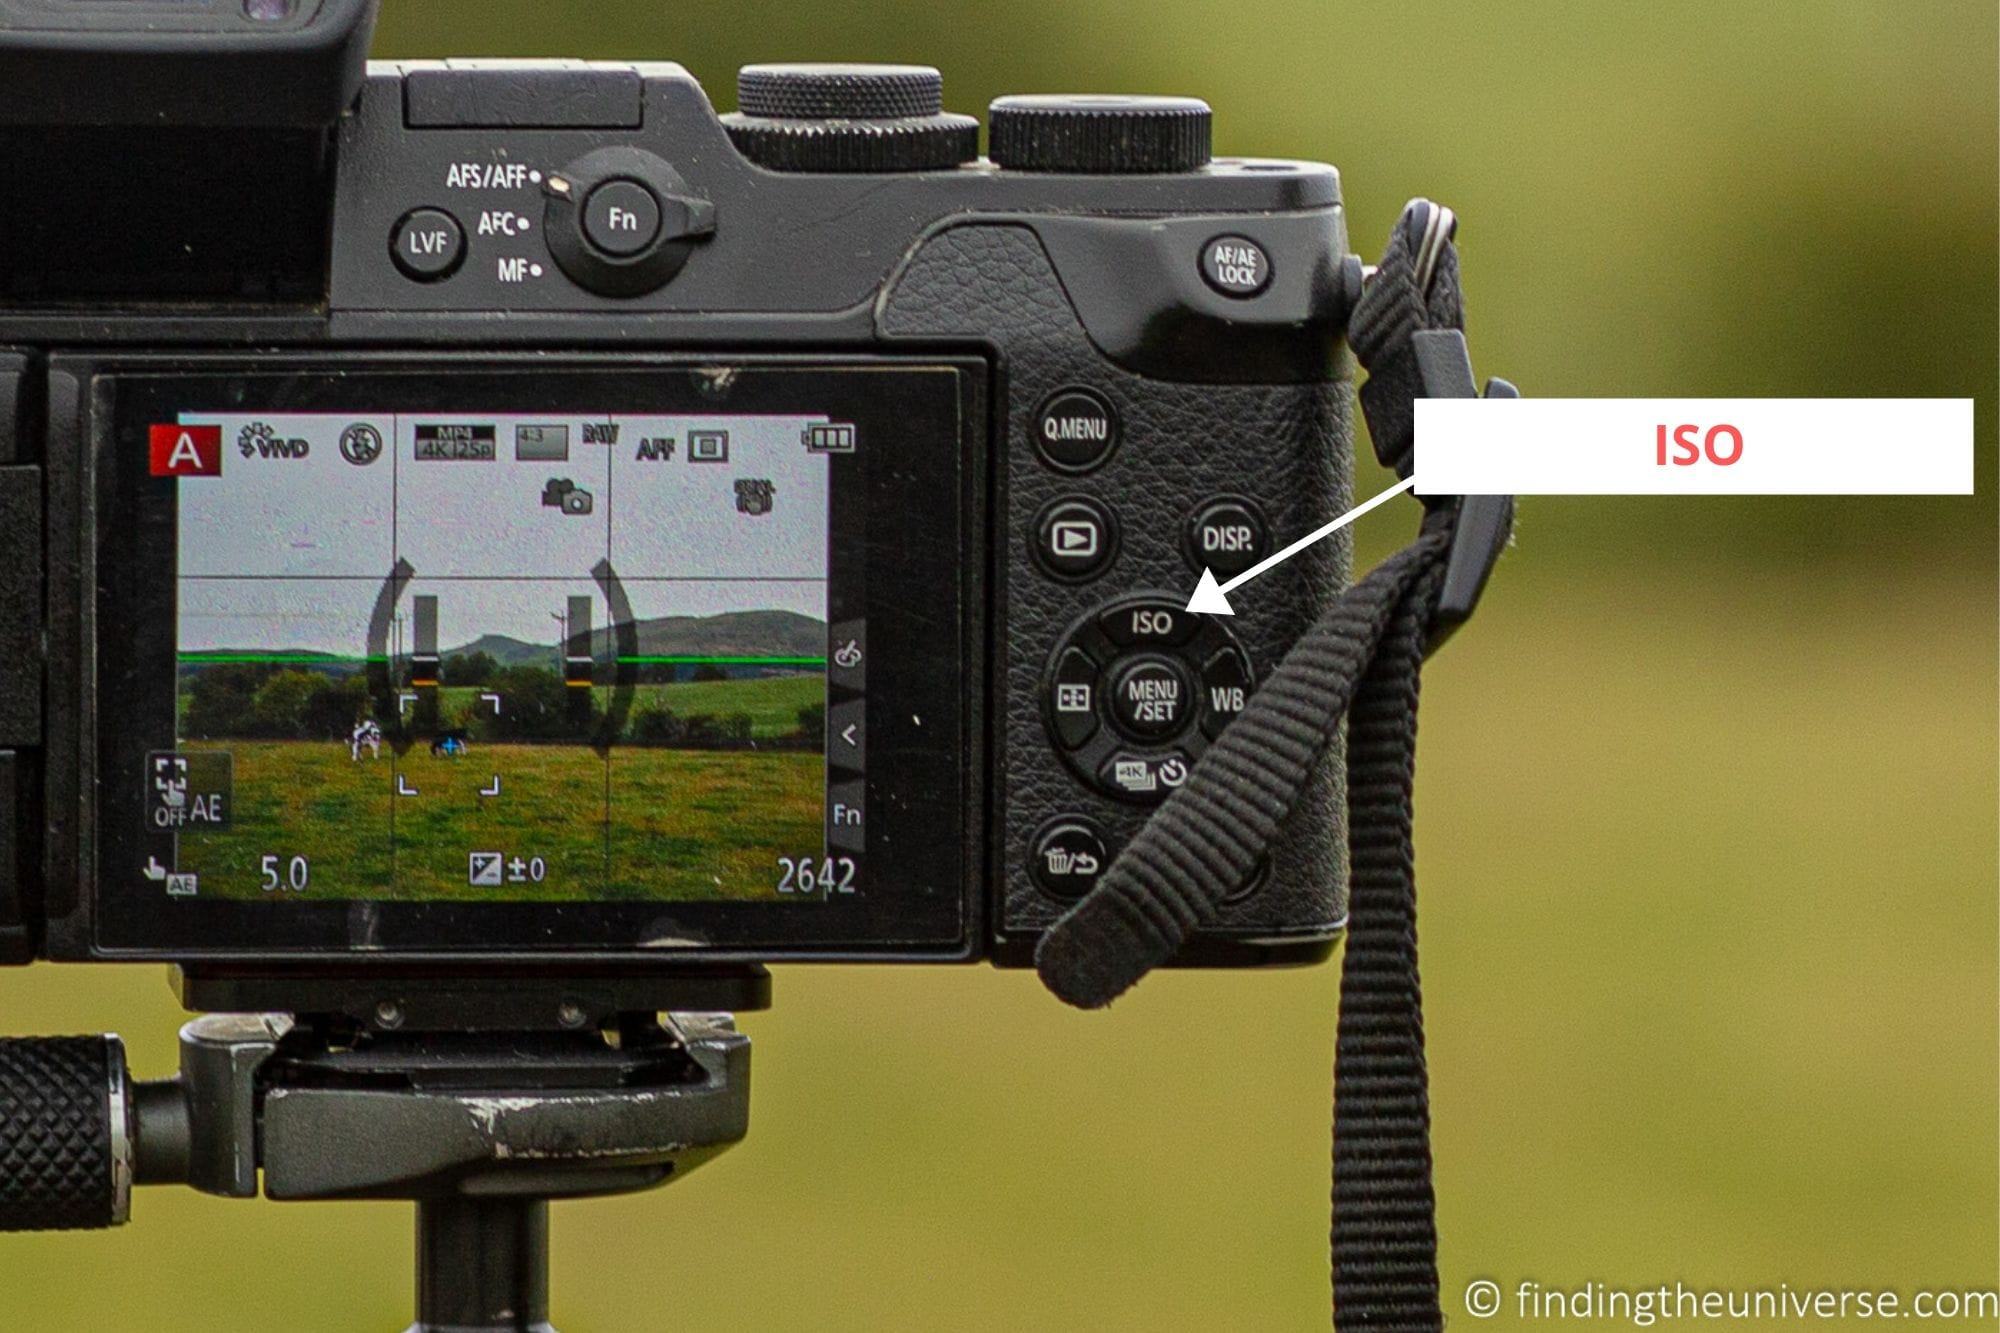
ISO Push button
Nearly every mirrorless camera should take a defended ISO button on the dorsum or top of the photographic camera. Pressing this button will have yous directly to the ISO settings. Frequently, pressing the ISO button will also mean the command cycle adjusts ISO.
ISO is one of the iii sides of the exposure triangle. If yous put the camera into transmission fashion and leave the aperture and shutter speed as they are, when you increase or decrease the ISO y'all will run into the image getting brighter and darker on the screen.
A side upshot of increasing the ISO is that your images will get more noisy. Most mod mirrorless cameras perform admirably at an ISO range of 100 – 800 (for daily apply I recommend 100-400 range), and racket will start to creep in from ISO 1600 and higher.
Noise appears equally blotches of grain or color on your images. It tin can exist difficult to see on the camera's screen, but when you expect at your images on a computer screen at 100%, it will be very obvious.
Because of the noise event, ISO is often the last control we want to apply to accommodate the brightness of an paradigm. Ideally, you lot volition be able to get the correct exposure past adjusting the discontinuity and shutter speed, and using a nice low ISO.
Of course, this isn't ever possible. When yous are shooting in depression lite, you might need to increment the ISO. Even so, it is really important to remember to reduce this dorsum to a normal range of 100 – 400, which should piece of work in most photography situations. If yous leave the ISO too high, you run the risk of all your images turning out noisy, which is not something you lot want.
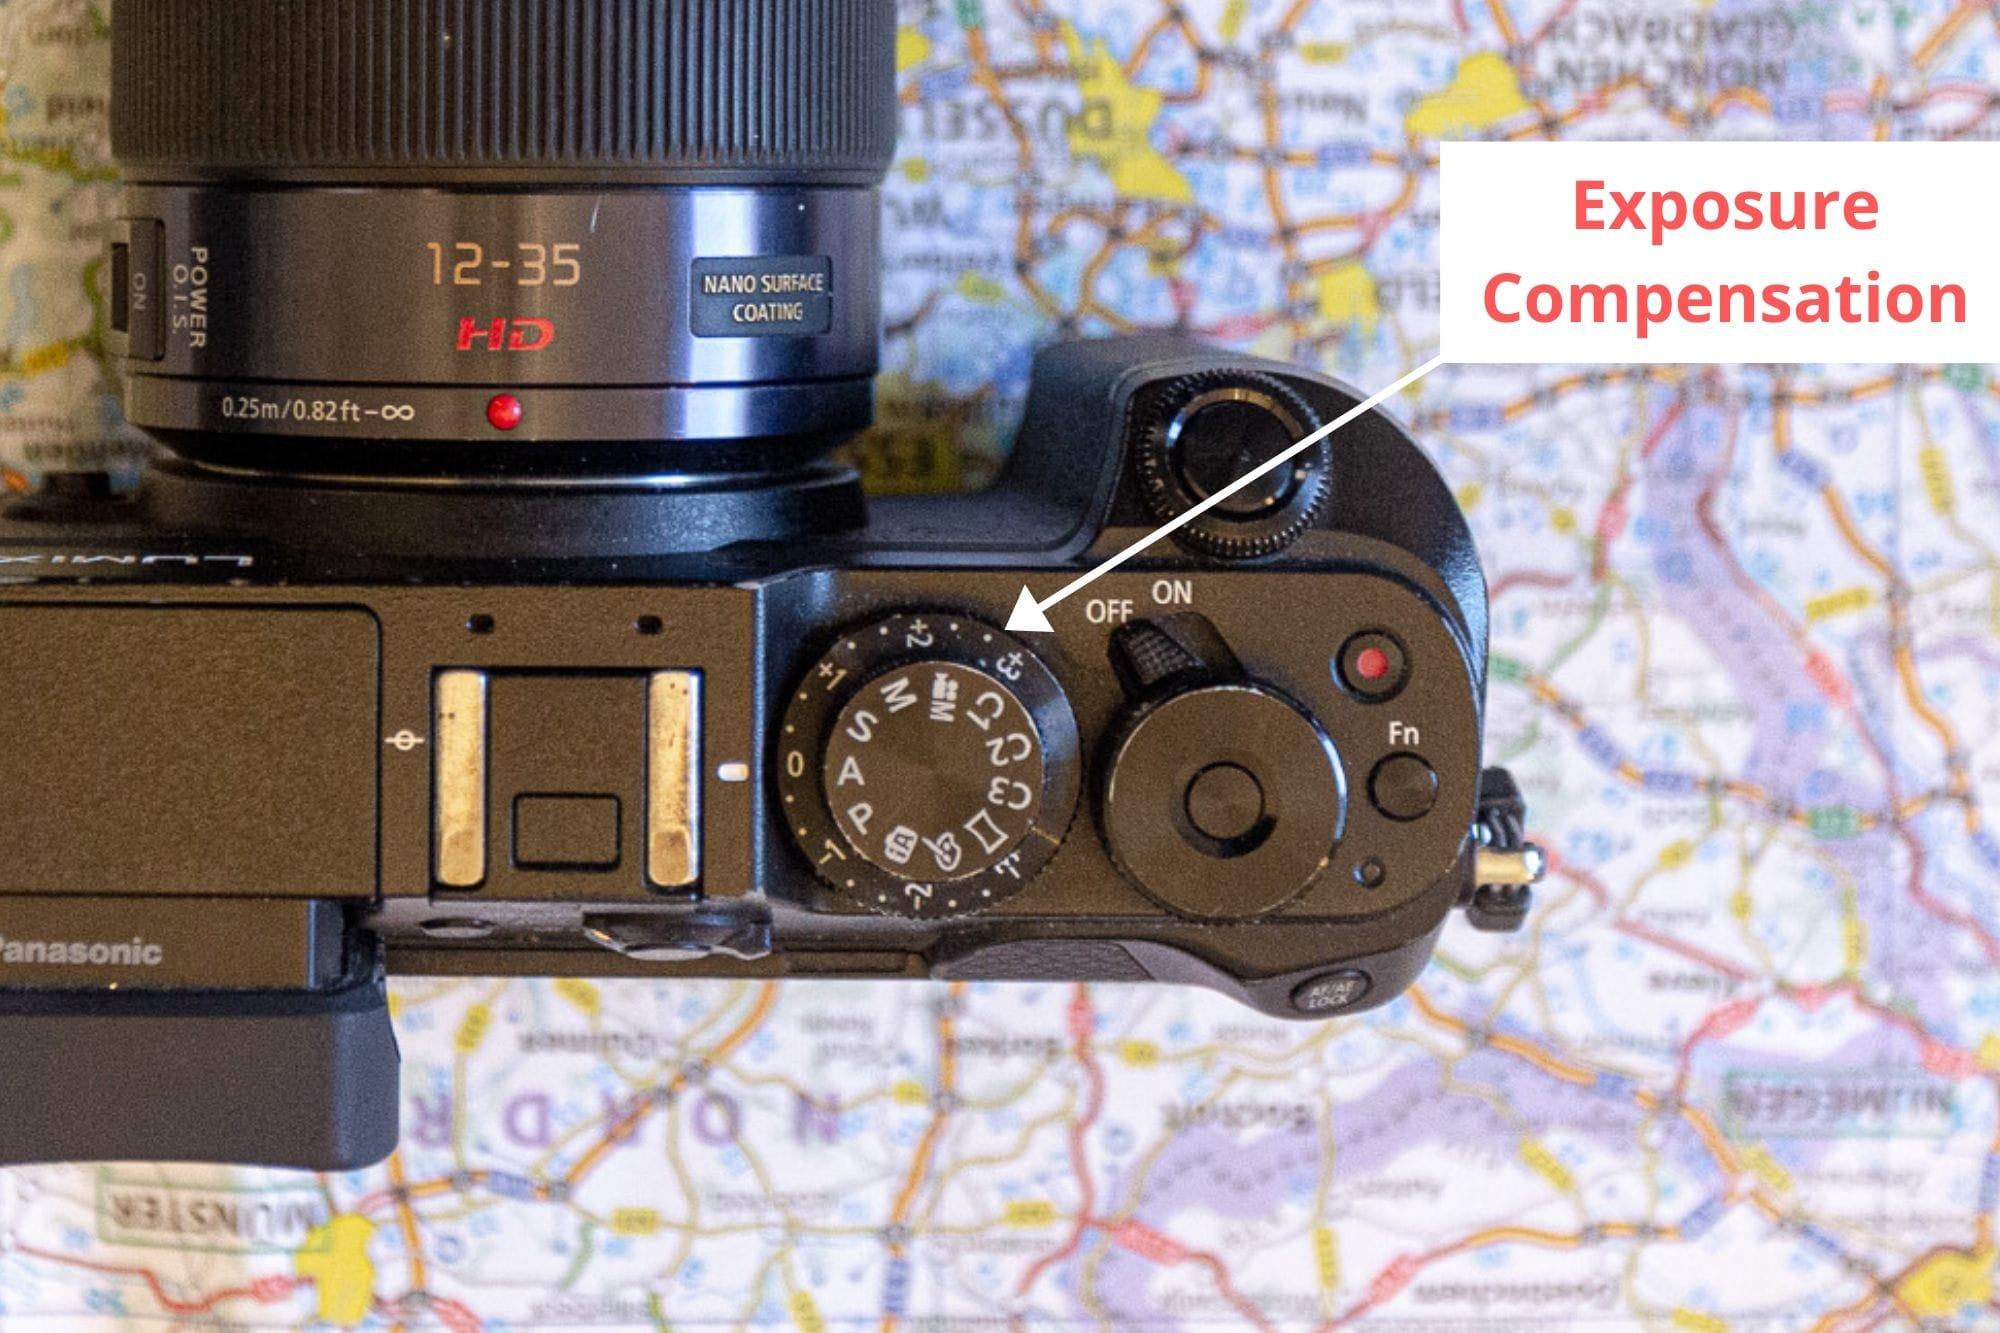
Exposure Compensation Button (+/-)
Exposure compensation is a common characteristic beyond the bulk of cameras, including smartphones and compact cameras. It'southward basically a quick override button that lets you brighten or darken an image without having to play around with whatever settings.
The technical term for capturing an epitome in photography is actually an exposure. This is because you are exposing the camera's sensor to the low-cal for a defined menses of time (the shutter speed), with the exposure being the end event.
In about situations y'all want a correctly exposed paradigm, which is non besides brilliant and not as well dark. Camera'southward apply a variety of methods for computing the right settings for this correct exposure, merely they don't always get information technology correct.
For this reason, you can speedily tell the camera to increase or decrease the brightness of the image using the exposure compensation button. Usually this volition be marked with a +/- push button.
When you printing the button, you lot will be able to increase the exposure compensation, or subtract it. This might be washed on screen, or by using the control wheel when exposure compensation is selected.
Some cameras accept a dedicated exposure compensation bike rather than a push button. This achieves the same effect, information technology'south but a niggling faster to do.
On a mirrorless photographic camera, the modify to your paradigm should be immediately apparent on screen, as it brightens and darkens the shot.
When you brand changes to the exposure bounty setting, yous should encounter the camera making adjustments to the aperture, shutter speed, or ISO in gild to really make the epitome brighter or darker. The numbers for these settings will appear on screen.
As with ISO, it'due south really important to call up to put your exposure compensation back to nothing afterwards yous have finished using information technology. I have spoken with folks learning photography who accept accidentally prepare their exposure compensation to a high number at some signal, and then they tin can't figure out why all their images stop upwardly beingness way as well bright. This is a common photography mistake, so endeavour to avoid it if you tin can.
Flash Button
Many of the mirrorless cameras on the market today characteristic some sort of congenital-in flash. We've written a couple of guides to wink in photography, specifically around how to turn off flash on your photographic camera, and reasons to turn off flash on your photographic camera.
Suffice to say, nosotros aren't huge fans of the congenital-in flash on almost cameras every bit the results are sub optimal. In add-on, there are many locations where wink photography isn't immune.
Still, folks are used to having a wink and manufacturers are used to putting them into cameras, and flash does come up in handy at times. The skillful news is that information technology's quick and easy to adapt the flash settings on your camera, as well-nigh mirrorless cameras feature a dedicated wink button (assuming they have a flash built-in).
My mirrorless camera doesn't accept a flash congenital in, but every bit the flash button is pretty universal, this image of a compact photographic camera flash button should practice! The wink button is the little icon on the correct side of the back of the camera.
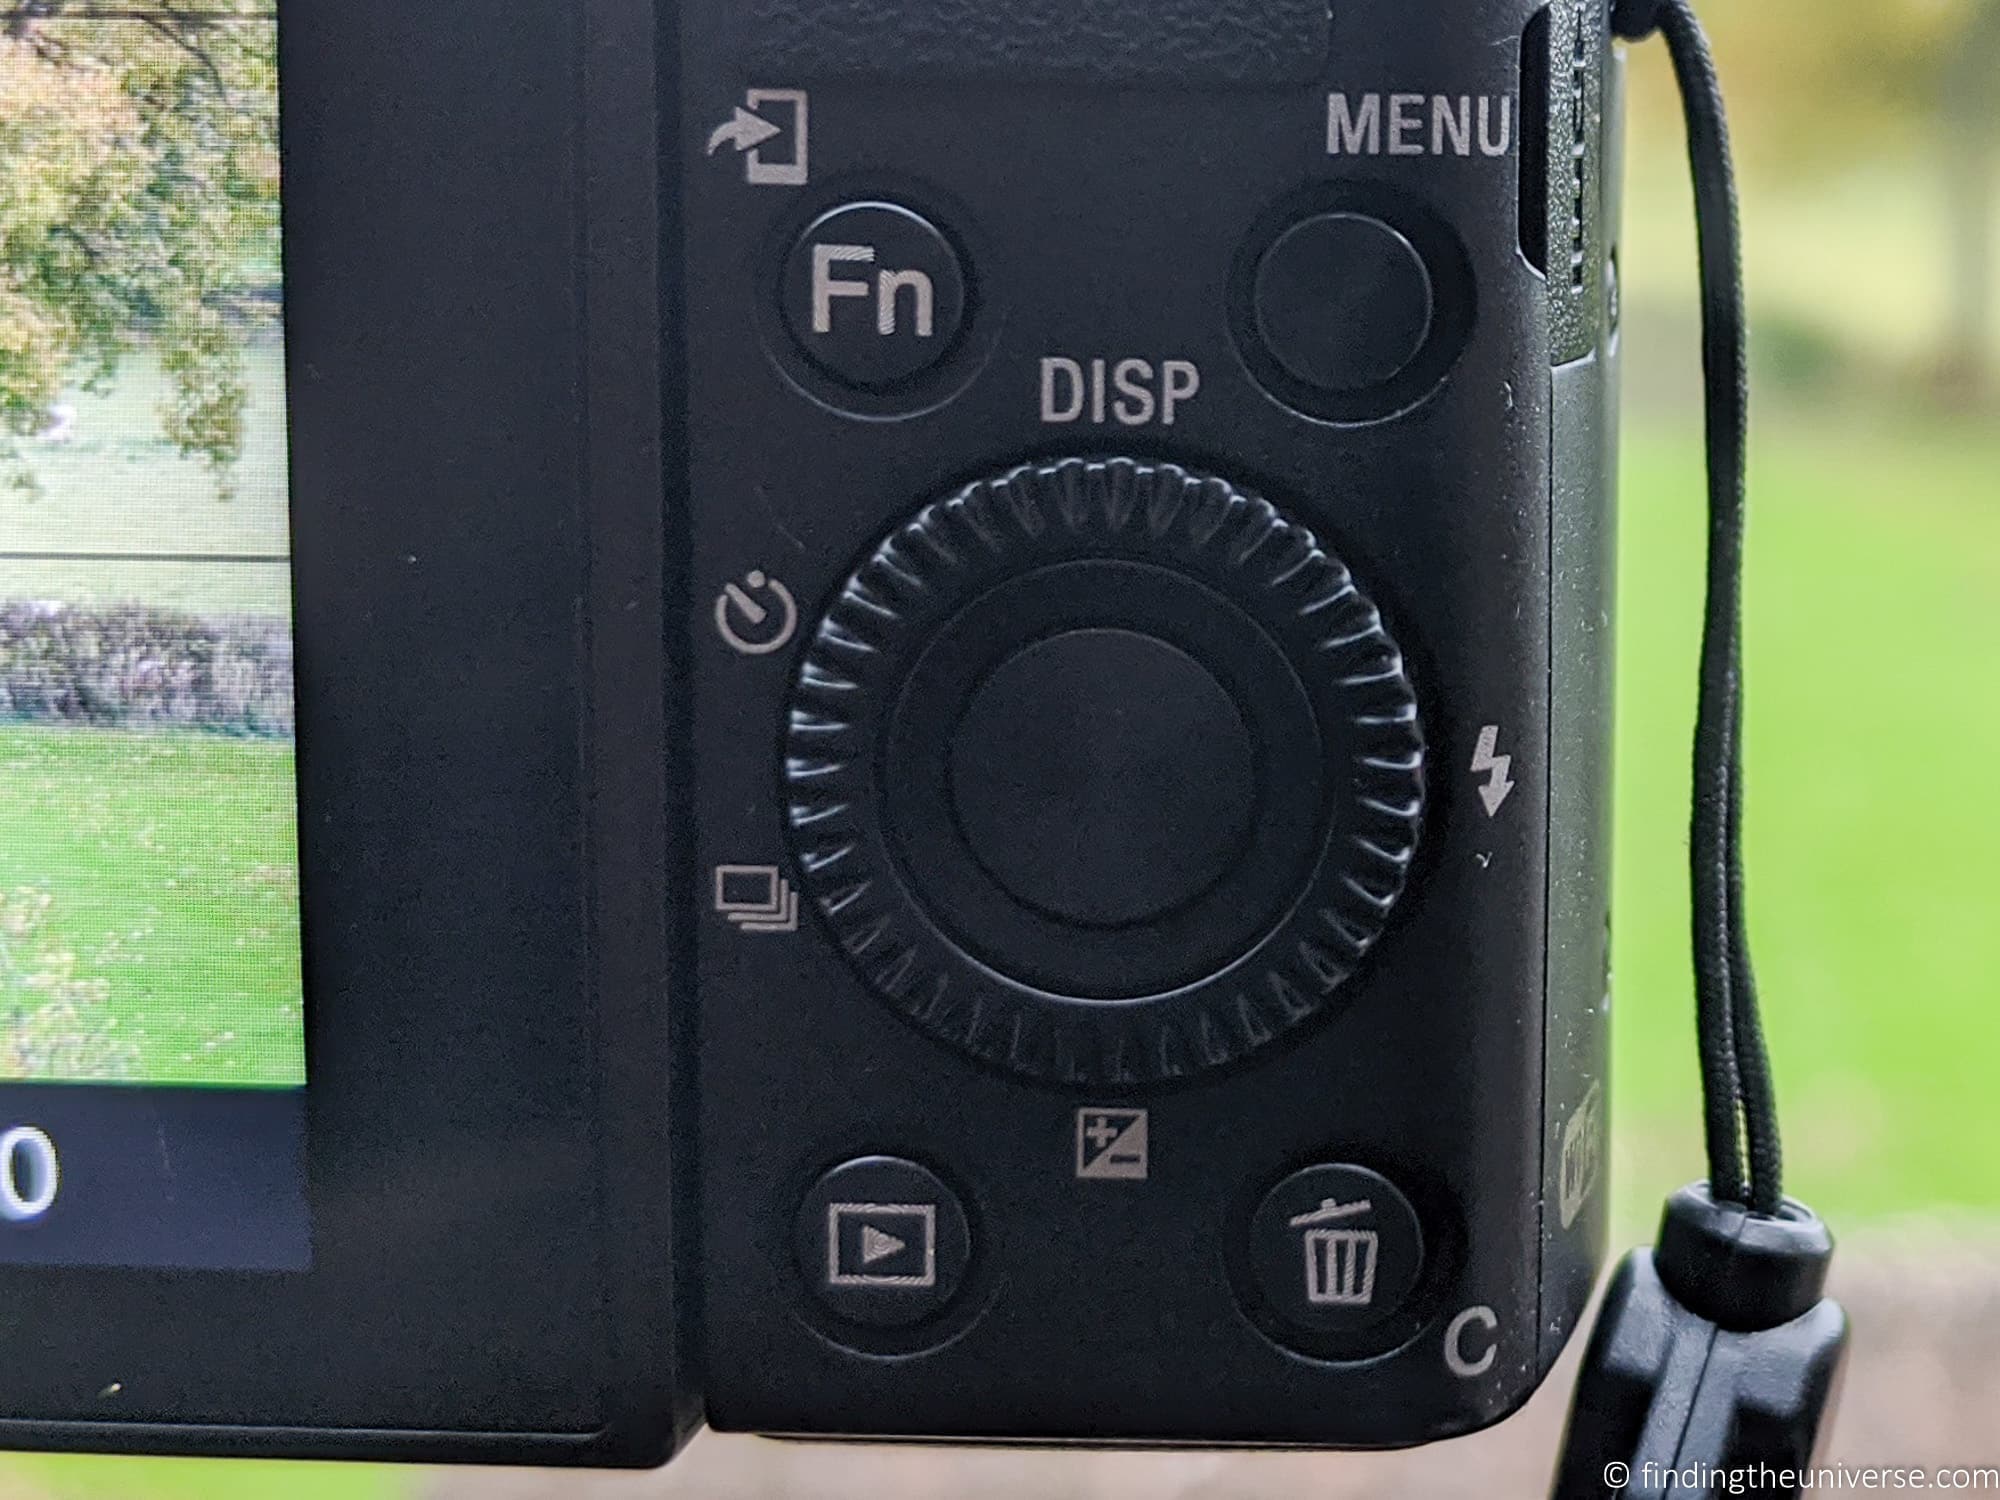
Pressing this button will take you to the wink settings menu, where you tin enable or disable your motorcar wink settings. Nosotros'd recommend disabling it for most situations unless yous really desire to use it. This will cease information technology from going off when yous don't want it to.
If yous have an external wink unit, this will ordinarily be controlled via information technology's ain carte du jour system and buttons, although you will need to configure the photographic camera via the menu as well.
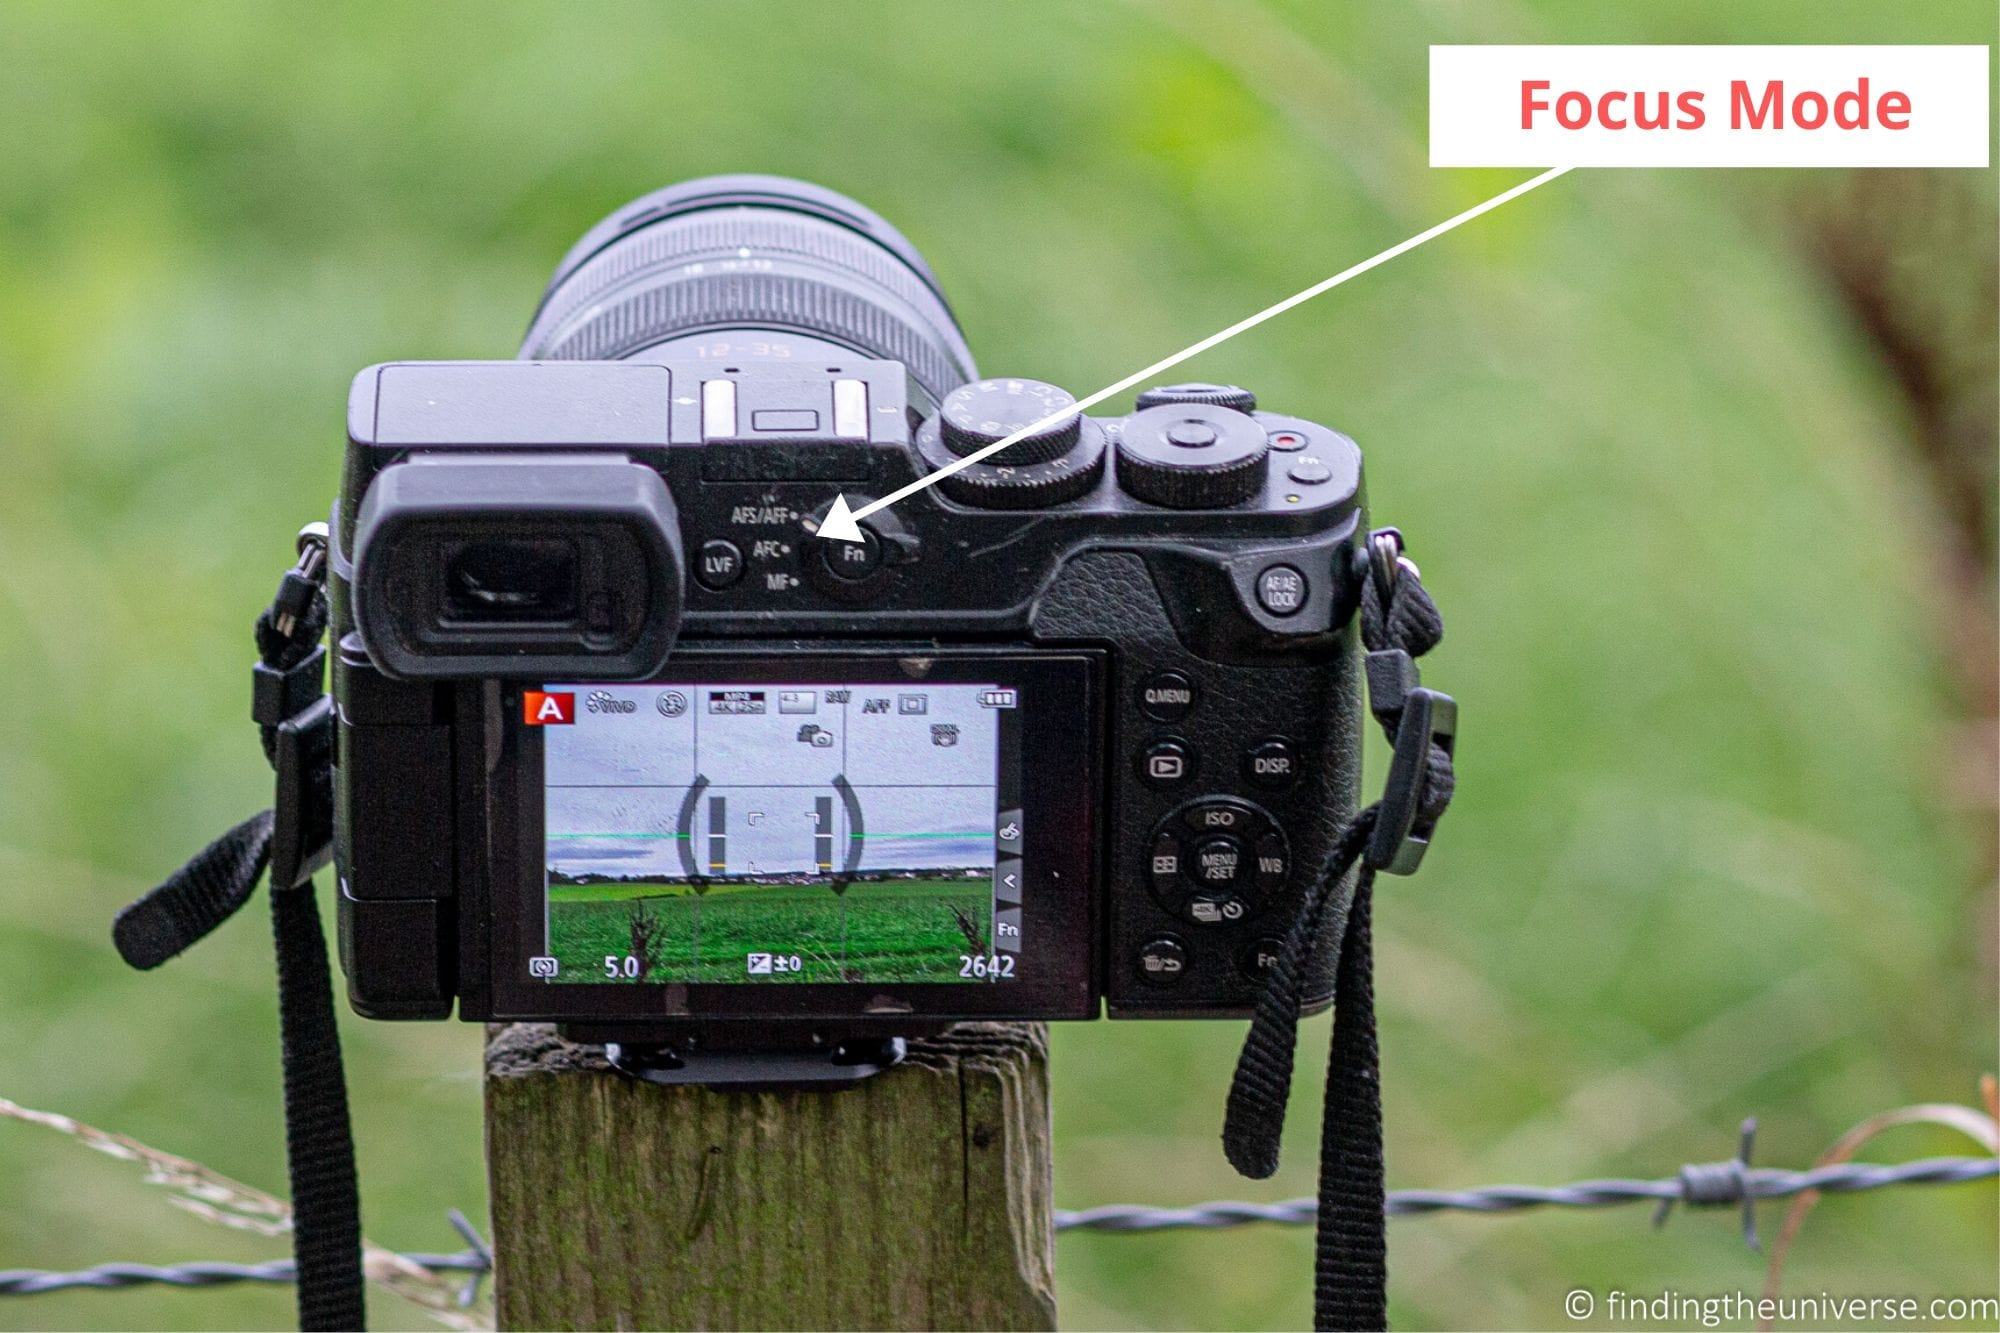
Focus Mode
When we have a movie, nosotros want our field of study to be dainty and sharp. This sharpness is achieved by adjusting the focus. An in focus epitome volition be abrupt, whilst an out of focus image will be blurry.
Virtually mirrorless cameras on the market today ship with a variety of focus modes, which permit you to adjust how the photographic camera focuses. The focus mode button on the camera, which may likewise exist a punch or toggle, lets y'all quickly switch between some of these modes.
If you are looking for the button on your camera, it volition unremarkably be labelled something like "AF", which stands for Autofocus. If it'southward non accessible via a push, you might have to get into your camera'due south settings carte, where information technology will be called something like "focus manner".
The exact modes your photographic camera has will depend on your manufacturer, only unremarkably there are at least three modes you lot tin can access quickly.
The starting time of these will be the standard focus mode, possibly called auto focus single. This is the focus mode you would use for subjects that are not likely to move. In this style, the camera will focus on the field of study, and then lock the focus.
The next mode volition be called something similar motorcar focus continuous. In this mode, in one case you accept a subject, the camera volition do information technology'southward best to runway focus on the subject even if it'south moving. This means yous will get sharp shots of your subject even if it moves as you lot take ane or more shots of it. Continuous focus is good for any moving bailiwick, including photos of wild fauna, photos of sporting events, or photos of people moving.
The 3rd mode you lot should also have admission to will be a manual mode. Manual manner ways that you have total control over the focus. Usually, there volition be a focus ring on the lens itself, which you twist to change focus.
I should add together that many cameras have boosted versions of the to a higher place modes. For example, many cameras offer some sort of face or eye detection for focus, meaning the camera will automatically detect and track focus on a subjects face or middle. This can be especially useful for taking pictures of people in movement.
Zoom / Focal Length Ring
A mirrorless photographic camera, like a DSLR camera, lets you modify the lens depending on what you are shooting. In that location are two types of lens that yous can get. These are "prime" lenses, where in that location is no zoom, and "zoom" lenses, where yous can zoom in and out on the scene.
In photography terms, this "zoom" is known as a focal length. This is a number in mm. The smaller the number, the wider the shot, and the more than of the scene y'all will be able to encounter. The larger the number, the narrower the shot, and the larger your subjects will be.
Near lenses have a dedicated focal length / zoom ring on the lens itself, which you can twist to increment or subtract the zoom corporeality. Some lenses do not have this however, in which case in that location will be some sort of button on the camera body itself which you lot can apply to electronically zoom the lens in and out.

Metering Style
Another push button that yous might find on the back of the camera will allow you lot chop-chop change the metering mode.
As previously mentioned in this guide, before you actually accept a photo your photographic camera calculates the correct settings by measuring the amount of light in the scene. This is then you get the right exposure, and the prototype is not also vivid or too dark.
The way the camera measures the low-cal is through a process known as metering.
By default, most cameras are set upwardly to evaluate the whole scene that is in frame to create a balanced exposure. However, there are some scenarios where this will not give the best results, such as a scene with a very strong contrast between the nighttime and brilliant areas.
In order to shoot in these more challenging situations and notwithstanding get good result, you can set your camera to different metering modes. This will help the camera zero in on the part of the scene you want to expose correctly for.
Different cameras have dissimilar metering modes. Most cameras will have have a spot metering mode, which only uses the calorie-free information in the very eye of the image. For other cameras, you might be able to set the metering point to be the focal point, which is also a adept choice in many cases.
The photographic camera I am using to demonstrate does not have a metering manner push, but this function has to be accessed via the card system.
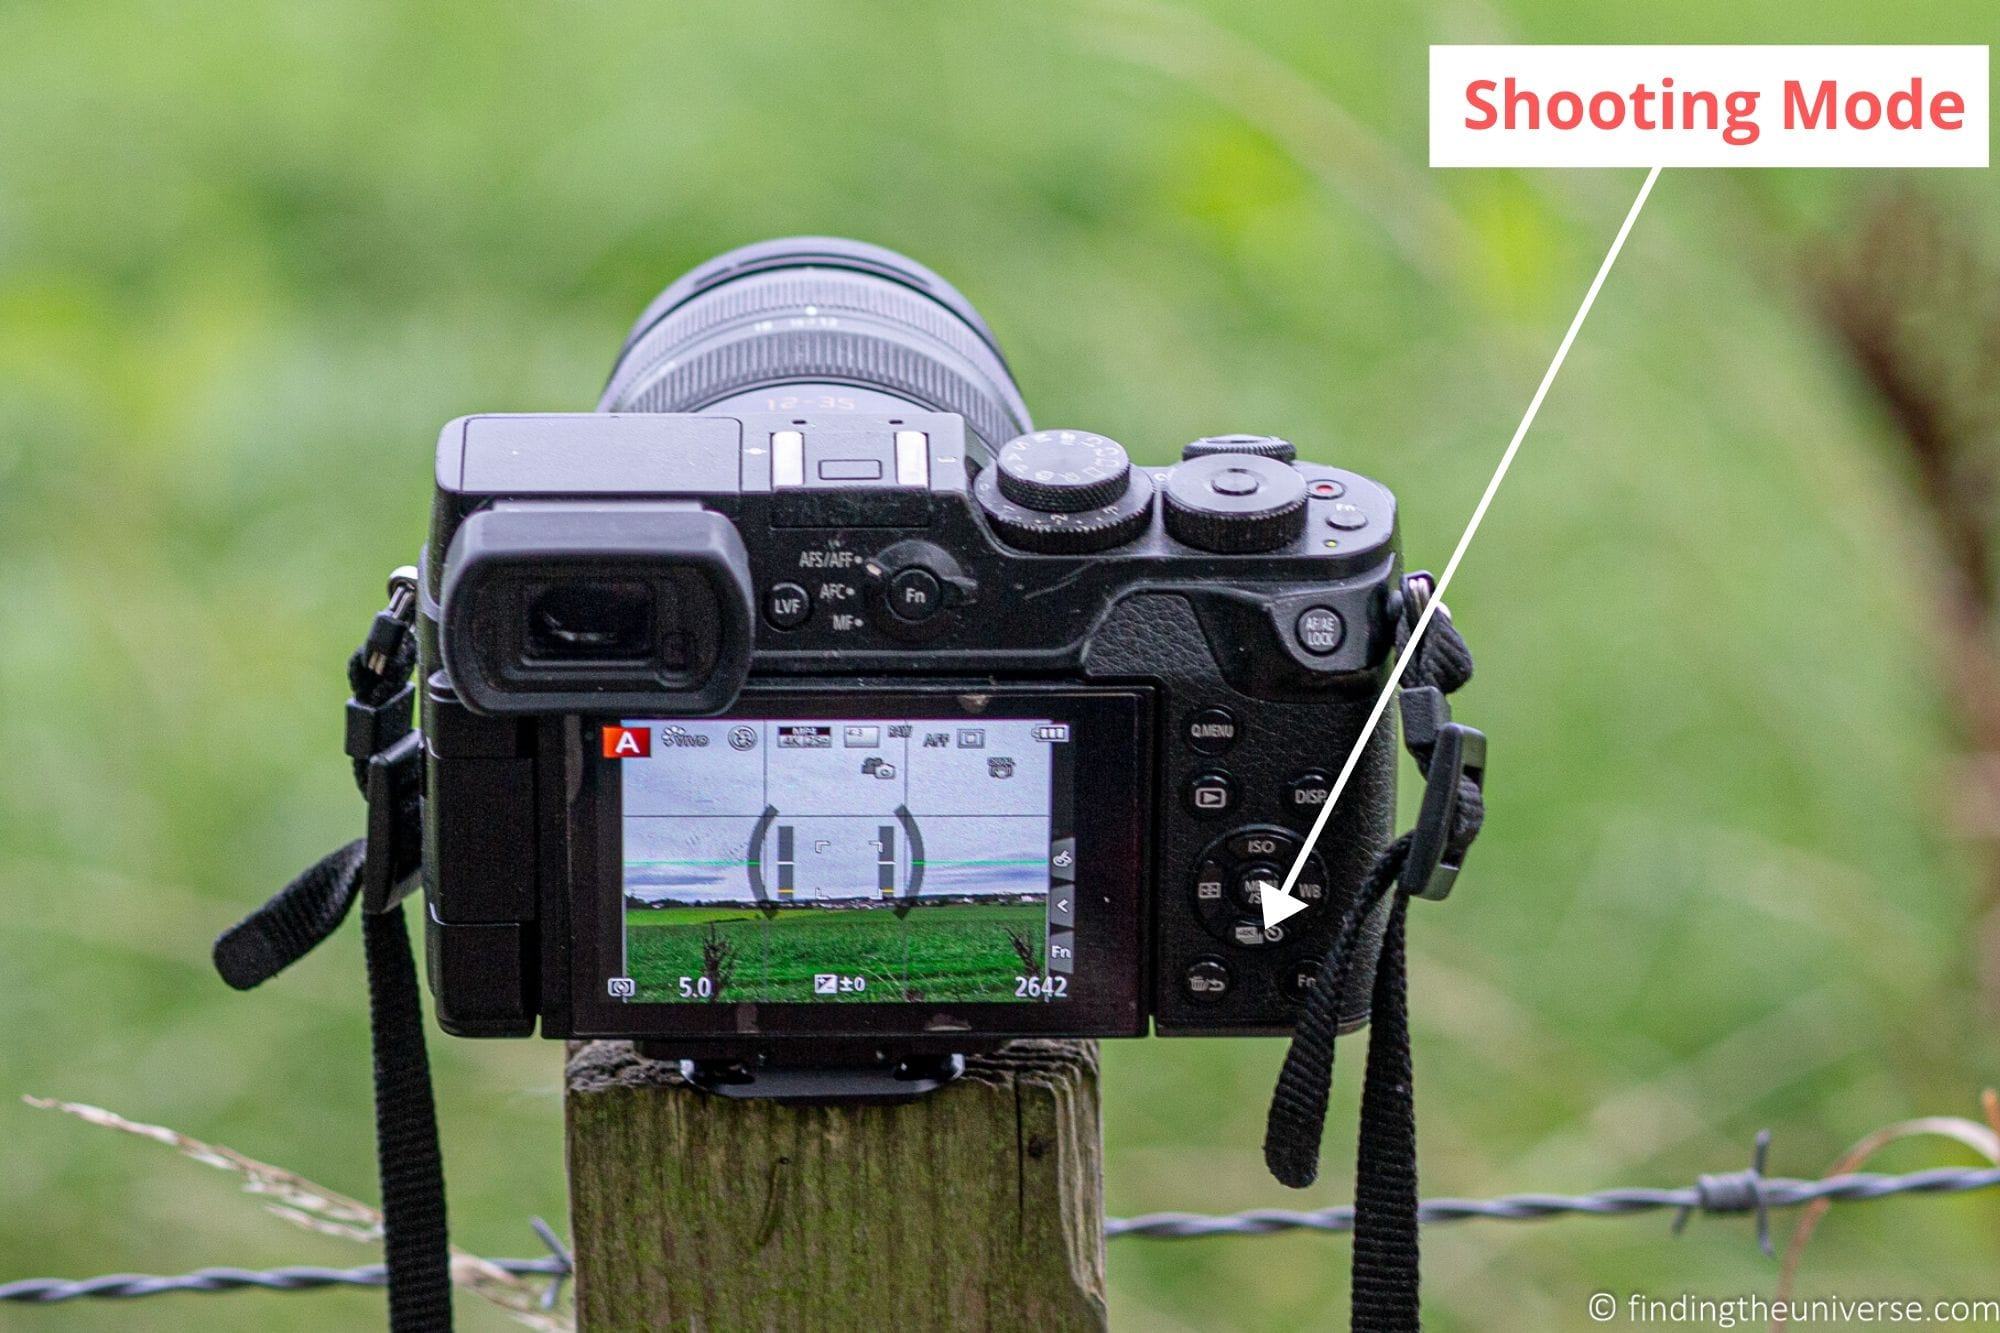
Shooting Mode
Next up, the shooting mode.
If yous've ever wanted to have a moving picture of yourself, this is the mode you lot desire to conform.
Shooting mode tells the camera how to accept the pic. Most cameras will accept a single shot manner, a continuous shooting mode, and a timer manner.
The single shot style volition take 1 photo when you depress the shutter button. To take some other photo, you have to heighten your finger off the shutter push then depress it once more.
Continuous shooting fashion will have the camera keep to take photos while y'all hold the shutter button down. As long every bit you depress the shutter push button, it will keep taking photos. This is practiced for capturing action shots of something happening over time. Note you will need to use this in conjunction with a continuous focus mode in lodge for all your shots to exist precipitous and in focus.
Finally, most cameras on the market today come with some class of timer mode. This lets you press the shutter button, and the camera will take an image after a period of time, oft 10 seconds. This is useful for capturing self portraits and group shots.
Video
This article is primarily about photography rather than video, however these days all the mirrorless cameras on the market also accept the capability to shoot video.
As such, there are ordinarily buttons defended to video on the photographic camera too. These normally permit you apace toggle the camera between photograph mode and video mode, and in that location may besides be a defended button to end and start video recording every bit well.
When in video mode, most the other buttons on the back of the camera will piece of work in the same style (video is later on all very like to photography), simply it is definitely worth checking your specific camera manual for any differences if you do intend to use your mirrorless camera for video.
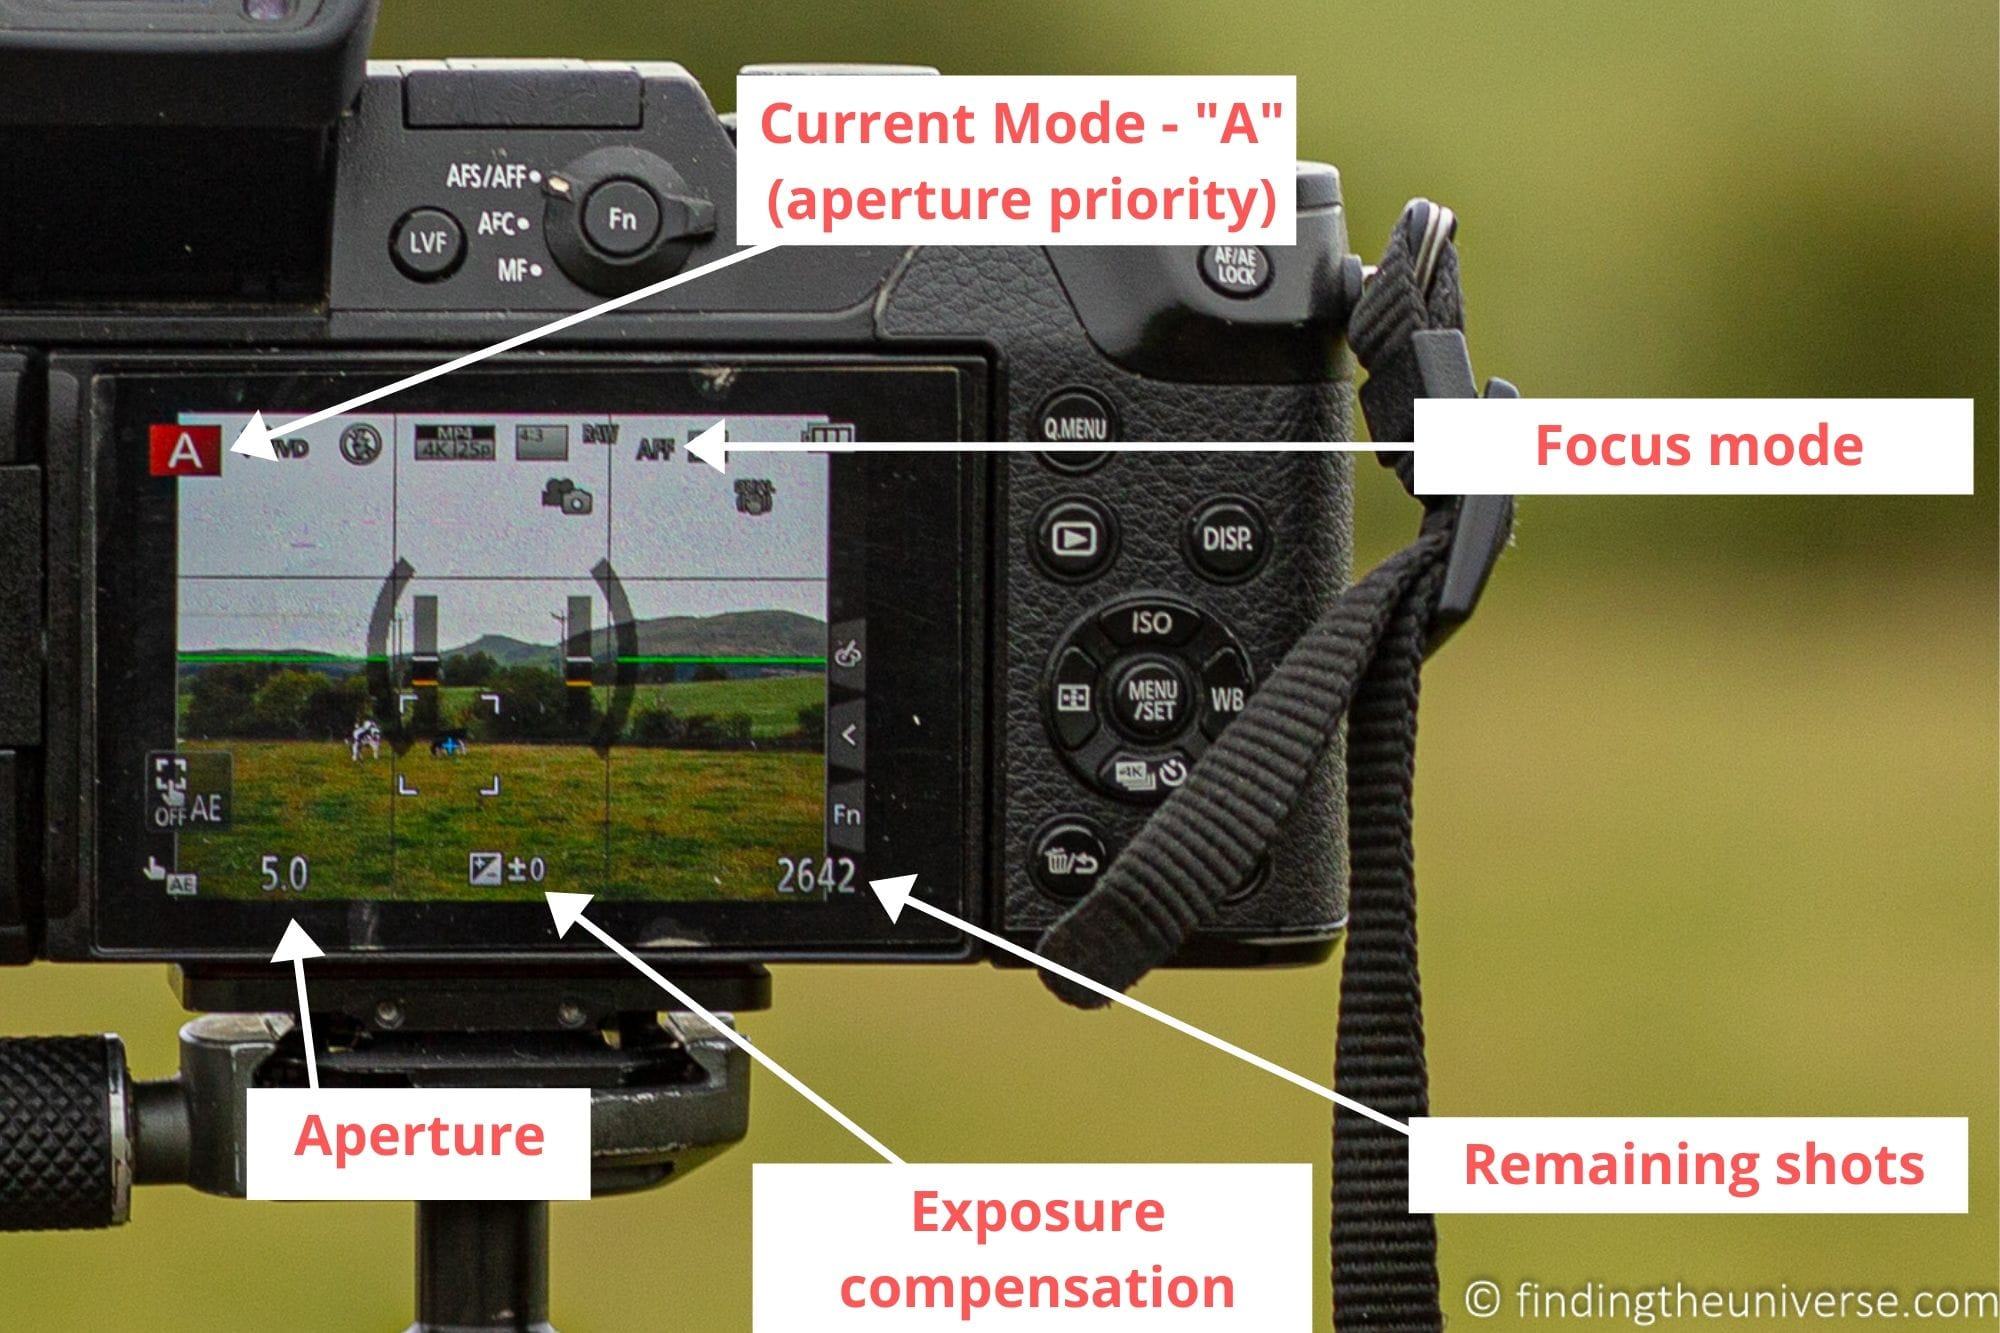
What The On-Screen Display Tells You lot
Lastly, your mirrorless camera will take a screen. This may or may not be a touchscreen. If it is a touchscreen, you will likely be able to access many of the above controls and settings through the touchscreen interface as well as the buttons.
In addition, the display will overlay a lot of data on the epitome. This information will relate to various photographic camera settings, and it's important to understand what is being displayed so y'all can be certain the camera is prepare up correctly.
Exactly what is displayed volition vary from camera to camera, and besides depending on how yous take your photographic camera set. Usually at that place's a "display" or "disp." button to toggle unlike levels of information.
Withal, here are some of the key pieces of information you volition likely find on the screen of your mirrorless camera. This information will usually also display on the electronic viewfinder if your photographic camera has one.
- Current mode the mode punch is set to
- Aperture
- Shutter speed
- ISO
- Remaining bombardment
- Remaining images
- Focus style
- Flash condition
- Whether you lot are shooting in RAW, JPG, or RAW+JPG
- Exposure compensation
- WiFi / Bluetooth / GPS status
- Electric current focus point
- White rest
- If image stabilization is active
Of all the above, the almost important readouts to go on an eye on are the current ISO, aperture, and shutter speed.
Some cameras can also overlay a horizon levelling tool then you lot tin see if you lot are holding the photographic camera level, as well equally a filigree that follows a compositional rule like the dominion of thirds.
Y'all can see both of these features enabled in the image below on my mirrorless camera example.
How to Become Ameliorate Photos With A Mirrorless Camera
In this part of the guide I am going to become through some tips for using your mirrorless camera, to aid you start getting improve photos right away. I'm also going to include some areas you should focus on in your photography generally, which are photographic camera agnostic, but still important.
Hold Your Mirrorless Camera Properly
The kickoff thing you need to do when using your mirrorless camera is to learn how to hold it properly for taking photos.
This communication applies to all types of camera. Property your photographic camera properly will brand it more stable and will result in fewer blurry pictures as a result of camera motility whilst you lot accept the shot.
To hold your mirrorless camera, your correct hand should grip it effectually the correct side of the photographic camera, with your right alphabetize finger over the shutter button. About mirrorless cameras accept a grip in this position which makes positioning your correct hand quite easy.
A common fault at this betoken is to shoot one handed. You definitely don't want to do this. Holding the camera with both hands will hugely increase the stability and result is less lost shots. This is particularly of import when shooting indoors or in any state of affairs where there is limited low-cal bachelor, as the camera will use lower shutter speeds.
When taking a picture, your left hand should be supporting the camera lens. Commonly this volition be in a palm upwardly manner. You lot might demand to rotate your manus to adjust focus or zoom, but when you are set up to shoot you will ideally return to the palm upward position.
For maximum hand held stability, tuck your elbows tight to your body. This reduces how much your arms can move during shooting.
If you lot find yourself struggling to hold your photographic camera steady fifty-fifty following the to a higher place steps, then you lot should consider investing in a travel tripod which will let you keep the photographic camera totally still in every situation. This will guarantee sharp photos.
Understand the Settings and Modes
In the kickoff part of this guide I went through a variety of the controls, modes, and settings that yous take available to you on your new mirrorless camera.
Really, I just want to reiterate that it is of import to learn what these modes, settings and controls practise.
It is true that every bit the technology inside a camera gets improve, many cameras piece of work very well in automatic mode. They are cracking at figuring out the calorie-free, figuring out what you are taking a picture of, and identifying and even tracking your subjects.
So for many photographers, you volition find that in automatic your camera volition get good to great shots at least lxxx percent of the fourth dimension.
However, you don't want to miss a shot because the photographic camera accidentally picks the incorrect subject, or misjudges the lighting conditions, or just gets the settings wrong. It is for this reason that you desire to take full control of your camera, or at least know how to do this.
A mirrorless camera is after all an expensive and capable scrap of equipment, and the best fashion to go the most out of it is to full understand how to utilize it.
I would add too that yous should read the instructions' transmission – information technology often comes in paper form with the camera or you lot tin look it up online. Each camera is a scrap different and its of import to know how to use your detail camera and get the most of its functionality. The all-time way to do that is to check out the instruction manual.
Learn About the Exposure Triangle
When it comes to photography, one of the most of import concepts to understand is the exposure triangle. I have touched on this in this guide a few times already.
The exposure triangle can be a complicated seeming concept that takes a while to grasp. Information technology's also a adequately large topic, and I've put together a detailed guide to the exposure triangle here, which is worth reading.
Still, as a summary, the exposure triangle simply refers to the three controls that all mirrorless cameras offer you to control the exposure of the image. Information technology's called a triangle because there are three controls, similar the 3 sides of a triangle.
These three controls are discontinuity, shutter speed, and ISO. These are terms that I have touched on already in this post, and are three of the most important photography concepts to get to grips with.
Changing any of these 3 controls will result in a modify to how bright the image you capture is – the exposure.
In addition, changing each of them will also change how the paradigm looks in a dissimilar way.
If you change the shutter speed, you change how motion appears in your image. A very fast shutter speed for example, like 1/2000th of a second, tin can be used to freeze fast action motion similar a race car. However, a fast shutter speed lets less low-cal in, and can result in a darker image.
Changing the aperture changes the depth of field of your image. Over again, this is an important concept to get to grips with, and I've written a guide to depth of field in photography to help. I likewise expand on this a niggling further on in the mail. However, put merely, depth of field controls how sharp the foreground, midground, and groundwork of your image are.
Finally, the terminal control you lot take over exposure is ISO. Increasing the ISO from say 200 to 600 will increment the exposure of your image. It volition too make the image grainier.
As a general rule, ISO is the last side of the exposure triangle that y'all want to change. However, if you can't achieve what you want past adjusting the shutter speed or aperture, then it is definitely a handy option to have.
Learn the Nuts of Composition
This mail service has largely been about the more technical side of photography, covering how your camera works, and the diverse settings you lot take available to you.
Nonetheless, obviously photography is about much more than than understanding how your camera works. More often than not, I believe there are three main components to becoming a photographer. These are:
- Understanding how your camera works
- Learning what makes a peachy photograph
- Mastering photo editing
This post has focused on the first of these three, but the other two are just as important in my opinion.
The 2d bespeak is all about learning how to put together, or compose, a great shot. Composition covers a great many things, just in summary you need to:
- consider where your subject is placed relative to other elements in the shot
- become to grips with concepts like the rule of thirds
- understand how colors work with each other
- learn how the eye searches out patterns like leading lines and symmetrical subjects
- start to think about how you can frame subjects
- retrieve about how to balance your composition
At that place are of form more compositional concepts that yous can get to grips with. By learning some of these tips and techniques, you can finer shortcut your manner to developing what many refer to equally a photographer'south centre. I'd advise reading through my more than detailed guide to composition in photography for more tips.
Finally, whilst I'm not going to comprehend photograph editing in this post, it is important. Run across my guide to the best photograph editing software which will give you some pointers as to what options are on the market place for photo editing.
Master Depth of Field
Getting to grips with depth of field is another great mode to start taking ameliorate pictures.
You have no dubiousness seen depth of field in photos, even if you weren't aware what it was. If yous think of a portrait of a person, very ofttimes the person volition be sharpy in focus, whilst other elements of the shot like the background and even the foreground, volition be pleasingly blurry.
Modern smartphones tin can even achieve this affect with special "portrait" modes, where the consequence is usually false through clever software.
All the same, traditionally this result has been achieved through changing the settings on your camera. Specifically, as mentioned in the section on the exposure triangle in this guide, by adjusting the aperture on your photographic camera, you tin can command the depth of field.
If you set an aperture number of between f/1.2 and f/4 for example, you volition get a shallow depth of field. This ways merely your subject will exist in focus, whilst the parts of the image between the camera and your subject, and behind your subject, will be out of focus.
You would use this event primarily for portraits, or when y'all desire to isolate your subject area from the background.
If y'all set the aperture to a college number, like f/eight – f/sixteen, then more than of the scene will be in focus. You would typically do this for landscape shots, or any shot where you desire as much of the epitome to be sharply focused every bit possible.
To exercise your depth of field, I recommend putting your camera in aperture priority mode, and shooting the same scene and subject at different aperture settings to see the difference.
I also take a complete guide to depth of field in photography here for more information and tips.

Sympathize Light
As I've mentioned throughout the post, a camera is just a device for recording an image, which it does by capturing low-cal information.
As you would imagine, low-cal is therefore quite an important part of photography. Yet, non all lighting weather condition are the same, and understanding different types of light and lighting conditions is key to taking better photos.
To showtime with, there are different sources of light out there. The sun is mostly the commencement light source you will think of, but there are other light source, from indoor lights to stadium lights to camera flashes. Fifty-fifty at night, the moon and stars, or even the Northern Lights, can be a light source.
Different lite sources take different qualities, and tin outcome in different images. This may be due to their relative forcefulness or weakness, due to the color of light they emit, or simply as a result of the angle you are shooting them.
Shooting a photo towards the sun volition give very different results to shooting the same photo with the dominicus behind yous for example.
In addition, our primary low-cal source, the sun, gives different lighting results at unlike times of day and in different conditions weather, every bit the light is affected by the earth'south atmosphere.
I'grand not expecting you to go a meteorologist of course! There are however some simple rules of thumb effectually light that can help you get improve photos. These are:
- Generally, shooting with the sun somewhere behind your shoulder rather than in front of you volition get better photos
- If it's a partly cloudy day, if you can be patient and wait for the sun to come out, you will unremarkably get amend photos with more colour and contrast
- Shooting with the sun directly overhead results in flat looking images, so try to avoid this if possible
- Shooting at sunset and sunrise, when the light is a more golden tone, often results in the best images. This is known every bit the "gilt hour" in photography, although how long information technology lasts will depend on where you lot are in the world
Hopefully these tips on light give you lot some pointers for improving your photos.
Take Workshops or Courses to Improve your Skills
Another keen mode to improve your photography and accept better photos is to take role in some course of leaning program.
There are a range of unlike options, from in person workshops, to photo walks, to local seminars. Some universities and colleges offer courses you can sign up for.
If you've found this post useful and found my style of explaining photography concepts works for you, y'all might also be interested in my online photography course. I've taught thousands of students how to improve their photography in this course, and I'd dearest to aid you lot out too. I recollect that for what it includes, information technology's also incredible value.
You can read all about that and buy information technology for yourself, here.
Take Lots of Photos!
Last just not least on my list of ways to starting time getting better photos is, well, to practise! 1 of the joys of mirrorless cameras, and digital cameras in particular, is that one time you have invested in the equipment, you lot don't take to worry well-nigh the costs of getting moving-picture show developed.
This ways you tin can take as many photos as you want, try different settings, and really see how they change the look of a shot.
A mirrorless camera is particularly practiced for learning on considering every bit y'all change settings on the camera, you will come across the results in real fourth dimension on the screen or through the electronic viewfinder. So you tin can tell quickly what'south in or out of focus, and if the image is as well bright or too dark.
If you are struggling to find subjects or topics to photograph, and so I can recommend trying to fix yourself challenges around different subjects or themes, like wild fauna, portraits, moving objects, landscapes and and so on. Getting used to taking your camera with you everywhere you go will too help you on your photography journey.
How to Care For and Protect Your New Mirrorless Camera
A mirrorless camera is a serious investment, then you volition desire to keep it in good status then you can take photos for years to come up. Based on our years of international travel with a whole assortment of photography gear, I wanted to share some tips for keeping your gear in tip top status.
How to Protect your Mirrorless Camera
Whilst mirrorless cameras are generally fairly well congenital bits of equipment, they are yet ultimately an electronic device which has, amongst other things, components made of glass.
As a result, they can of course be damaged.
There are a number of options you have for protecting your mirrorless photographic camera.
The showtime two products we use on all of our cameras are a lens hood and a UV filter. These are two inexpensive products that will help protect the lens on your mirrorless camera.
A lens hood, also known as a sun hood, sits over the end of your lens and is primarily designed to reduce lens flare from the lord's day. However, in my experience, it also works very well to protect the end of your lens from bumps and scrapes when you accept the camera slung over your shoulder, and I never go anywhere without my lens hood on my camera.
A UV filter is a screw in filter that attaches direct onto your lens. On a digital photographic camera, the only function these serve is to protect the glass element on the terminate of your lens. However, every bit lenses can be expensive to replace, and UV filters run around $xv – $40, a scratched lens filter is a lot cheaper to replace than your whole lens.
I have literally dropped a camera from a few feet in the air onto concrete, and shattered both my lord's day hood and UV filter. However, the camera and lens have been fine, because the touch was cushioned and absorbed by these components.
I'm not saying a UV filter and lens hood mean y'all can become around dropping your camera onto concrete, only they are definitely a worthwhile investment in my opinion.
Another must-have accessory in our heed is a camera strap. Whilst nigh cameras come with the manufacturer'southward strap, nosotros think a third political party strap is often more comfortable and functional. My favorite straps are the Elevation Design ones, and we use both a sling strap and a hand strap.
Jess likes personalized straps such as those available on Etsy and the colorful camera straps by iMo.
I can as well recommend investing in a decent camera bag for your mirrorless photographic camera, which I go into a trivial bit more in the section below on travelling with your mirrorless camera.
Finally, it might exist worth purchasing a specific warranty or accidental impairment cover for your camera when you purchase it, or even presently afterward if possible. This will embrace your camera confronting a variety of mishaps, and is usually a worthwhile investment. You can come across some options hither.
How to Clean your Mirrorless Camera
To be honest, I don't practice much cleaning with my camera across keeping the lens clean and trying to ensure there's not too much dirt or dust on the outside of the photographic camera.
To achieve that, I use an air blower like this,and micro fibre cloths like this.
It is true that the sensors in mirrorless cameras are peculiarly prone to getting dust on them, which tin become apparent in your images. Sometimes I volition use my air blower to attempt and dislodge the dust, which will work to a point.
However, for more thorough cleaning I personally utilise a professional. See the section beneath on camera servicing for more than tips on that. I'd also advise checking your manual, which volition likely have advice on whatsoever cleaning and care steps that manufacturer recommends for your particular photographic camera model.
Tips for Travelling with a Mirrorless Camera
For many people, a camera is well-nigh usually used when travelling, and as travel bloggers, this is definitely truthful for us besides!
If y'all are planning on taking your photographic camera travelling, then I can highly recommend picking up a proper photographic camera bag to put it in. Unlike a normal bag, a photographic camera bag has lots of nice soft padding to keep your gear rubber and protected from the various bumps and knocks that are par for the class when on the road.
There'due south a wide range of camera bags on the market. When looking for a bag, I'd suggest finding one that will fit your camera every bit well as a few accessories, then yous accept plenty of room. Of grade, the ultimate determination on the right bag for you lies with you.
Personally, I utilise and travel with Vanguard bags. They make a wide range of photographic camera numberless, also every bit other photography accessories, and I've always plant their equipment to be well made and durable.
For case, they accept this relatively compact photographic camera handbag, this shoulder bag, and this backpack, all of which would work well for a mirrorless camera arrangement.
Brand certain if travelling by air that you check the airline regulations. As we often discover, weight can be an event with cabin luggage, especially if y'all accept a lot of photography gear. As such, you may demand to check certain items like tripods although most airlines will let you fly with them as conduct-on. Also y'all should be enlightened that some items, particularly batteries, are not permitted in checked baggage.
Finally, I can also suggest ensuring that your insurance policy covers your cameras. Many travel insurance policies have relatively depression single item limits, meaning that loss, damage or theft of your equipment might not effect in you getting the total value of your item back.
Instead, y'all might find that your home insurance policy can be upgraded to include more expensive items away from the home. This is how we cover our camera equipment.
Should y'all Service your Mirrorless Camera?
If you want to continue your camera in neat condition for a long period of time, then I would definitely recommend you consider getting it serviced from time to time, mayhap every couple of years at least.
In particular, you will want to get the sensor on your photographic camera professionally cleaned. This shouldn't toll besides much (around $xxx – $seventy nearly likely), and volition ensure your images are costless of any imperfections.
I try to become my cameras cleaned by a photographic camera servicing professional at to the lowest degree once a year since they are used so regularly and endure quiet a bit with all our travelling. You should be able to detect a service either online, or with your local camera shop.
Best Mirrorless Photographic camera for Beginners
If you don't actually ain a mirrorless camera yet, but this post has inspired you to get out there and get ane, I wanted to provide a couple of tips for the best mirrorless cameras for beginners.
We also have a more than detailed guide to the all-time mirrorless cameras which I recommend you check out, but here are two options that would make a great starter mirrorless camera at a reasonable toll bespeak.
1. Catechism EOS M200
I've been a Canon user since I was 13 years quondam, and I think they produce an incredible range of great cameras. The EOS M100 is no exception – information technology's a wonderful scrap of kit that is available at a corking price point.

For your investment you lot get a xv-45mm lens, and APS-C sized 24.2MP sensor (the same as you lot'd find in a larger Canon DSLR), also as WiFi and bluetooth support. It has a nice touchscreen interface on the back, and supports 4k video, but is defective an electronic viewfinder.
It is likewise missing in-body image stabilization, nevertheless this is rare at this cost point in either a mirrorless photographic camera or DSLR. Yous tin run into the latest prices and buy information technology online here.
ii. Sony A6600
I've been recommending a camera from the Sony A6xxx as a neat beginner'due south camera for years. There are a number of these at difference cost points, from the original a6000 (discontinued but can however exist found), to the loftier cease a6600.

We would recommend the a6600 if your upkeep allows information technology. For your money you get super fast autofocus, a 24.2MP APS-C sized sensor, a flip out touchscreen, in body paradigm stabilization, an electronic viewfinder, and upwardly to 11fps shooting speeds. It also has WiFi.
If we had to notice fault, it would be that we detect the menu arrangement to be a fleck of a challenge, but that might be because we are and so used to the Canon interface!
You tin come across the latest prices and purchase information technology online here.
Further Reading
Well, that was quite a lot on the topic of mirrorless cameras! Earlier y'all go though, I did want to share some more guides we've written on the subject of photography which I remember volition help you on your photography journeying.
Whether yous're a beginner or intermediate photographer, I'g certain you lot'll find something in these guides that will assistance you.
- We have a like guide for how to apply a DSLR and how to use a meaty photographic camera. Nosotros also have a guide to how a DSLR works
- Knowing how to compose a nifty photograph is a key photography skill. See our guide to composition in photography for lots of tips on this subject
- Once you've mastered discontinuity, you can control depth of field. Read more about what depth of field is and when you would want to employ it.
- If you have a lens with a zoom characteristic, yous can have advantage of something called lens pinch to make objects seem closer together than they are.
- We are large fans of getting the most out of your digital photo files, and do to that yous will demand to shoot in RAW. See our guide to RAW in photography to understand what RAW is, and why you should switch to RAW every bit soon as yous can.
- Yous're going to demand some fashion of editing your photos. Run across our guide to the best photo editing software, also our our guide to the all-time laptops for photograph editing. Nosotros too have a guide to getting the best performance out of Adobe Lightroom, our preferred editing software.
- If you're looking for advice on specific tips for different scenarios, we also accept yous covered. See our guide to Northern Lights photography, long exposure photography, fireworks photography,
- tips for taking photos of stars, and cold conditions photography.
- You lot may hear photographers talking about a concept chosen back button focus. If you lot've e'er wondered what that is, and desire to know how to beginning using it, see our guide to dorsum button focus.
- For landscape photography, you lot might find y'all need filters to accomplish the look y'all desire. See our guide to ND filters for more than on that.
- If you're looking for a groovy gift for a photography loving friend or family unit fellow member (or yourself!), have a look at our photography gift guide,
- If you're in the market for a new photographic camera, we take a detailed guide to the best travel cameras, too as specific guides for the all-time cameras for hiking and backpacking, the all-time compact camera, best mirrorless camera and best DSLR camera. We also accept a guide to the all-time camera lenses.
- If you desire a camera or lens, just the prices are a bit high, run across our guide to where to buy used cameras and camera gear for some budget savings options.
- We accept a guide to why you need a tripod, and a guide to choosing a travel tripod
- Ever wondered how to easily replace the sky in an paradigm? Cheque out our guide to sky replacement in photography for an easy procedure anyone tin can do.
- Finally, if you lot desire to improve your photography overall, you can join over two,000 students on my travel photography course. I've been running this since 2016, and it has helped lots of people take their photography to the next level.
And that'due south it for our detailed guide to getting the most out of your new mirrorless camera. As always, we're happy to take feedback and answer your questions – just pop them in the comments below and we'll become back to you lot as presently equally we tin.

Source: https://www.findingtheuniverse.com/how-to-use-a-mirrorless-camera/
Posted by: evansclaidecon.blogspot.com
0 Response to "Is The Shutter Active When Shooting Video On A Mirrorless Camera"
Post a Comment