How To Create A Network Marketing Blog

You Really Can Start a Network Marketing Blog in Just 15 Minutes...
If you're ready to start a network marketing blog, the simple steps in this post will help you get your blog website created in under 15 minutes. Although this post is geared toward network marketers, these steps will work for anyone looking to create a new website or blog.
I know you're thinking I must be crazy to say you can create your blog website in 15 minutes, but it's true, so strap in & let's make it happen!
Make sure you are on a desktop/laptop so you can follow along & take massive action & just get it done.
First, if you're not really sure whether or why you might need a blog as a network marketer, head on over to my last post "Why Start A Blog For Your Network Marketing Business" (and then come back here to learn how because *spoiler alert* you do).
Here's what we're going to accomplish today:
- Create your domain name & website host account
- Install WordPress
- Install your website builder & theme
Yes you will want to go in and customize with your own fonts and colors to brand it to you & start creating content, but don't get caught up in that now. The goal today is just to create/start your network marketing blog, so you can start doing all of that..
Step 1 - Create Your Domain Name & Website Host Account (5 Minutes)
Your blog website will need a place to live online, which means you need a hosting plan.
I use & recommend Bluehost to host your website because it's easy to set up, reliable, and has excellent customer service. Click this link to claim your special intro offer.
For the purposes of this tutorial, Bluehost is the web hosting platform that we'll walk through. If you're using something else, that's totally fine. The how-to just may be slightly different.
If you're using Bluehost, this is where you…
- Choose your plan – Basic is totally fine for now.
- Create a domain name – This is your URL. Remember you are branding this to YOU, not your network marketing company, so I would recommend using either your first & last name (like I did), first & middle name, or something around the general topic of your blog. I also recommend getting the ".com" version of your URL.
- Enter your info & create your hosting account. For the least expensive monthly price, choose to pay for 2 or 3 years up front.
By the way, if you're looking for more intermediate or advanced blogging strategy (as well as tons of other resources for a super low price), be sure to check this out:

Step 2 - Install WordPress (2 Minutes)
WordPress is the free tool you will be using to create your website. Most professional bloggers use it because there are so many more features, it's so much more customizable, it integrates well with other tools, and honestly it's just the best.
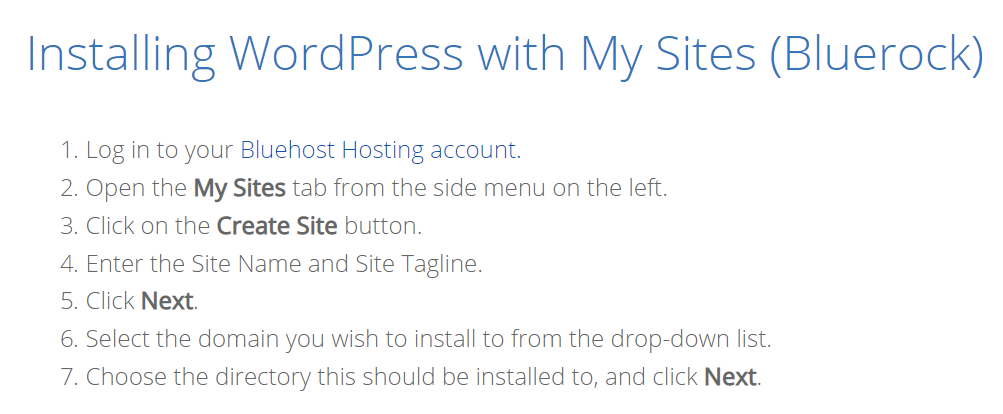
One of the things I love so much about Bluehost is how easy it is to install WordPress and get your site created. Here are the simple steps to install WordPress, straight from Bluehost help.

Here are some quick video instructions for how to install WordPress on Bluehost.
Step 3 - Install Your Website Builder & Theme
Whether or not you have website-building skills and experience, I suggest making this as easy as possible for yourself. Your time is valuable. When your goal is to spend your time on income-producing activities, you don't want to get caught up spending a lot of time building and designing your website.
I use and recommend Elementor to build and design your website. Using Elementor, you can essentially drag & drop all of your web design, without having to do much (or any) coding.
Elementor does have a free version if you want to play around with it a bit, go through some setup tutorials, and see if it's right for you. I recommend upgrading to the paid version quickly though because there are so many more features and it's really affordable.
Click here to check out Elementor.
Here's how to install Elementor on your new WordPress Site:
- Create your Elementor account
- Download the install file. If you've upgraded, you will have two install files (Elementor and Elementor Pro).
- Log into your WordPress account and click Plugins > Add New Plugin. At the top, click "Upload Plugin". Select your file.
There are actually two ways to do this, so if you need the full instructions to install Elementor on WordPress, click here.
After you get it installed, check out these help files on how to get started with creating your site using Elementor.
I personally recommend using Elementor's Theme Builder and using their templates to design your page layouts and any content you'll be re-using in multiple places. That way, you have full control over your design, it will be easy to change in the future, and those templates will come in handy for saving you tons of time as you create new content. Elementor has great documentation to get you going.
Wrapping it Up
If you made it this far, you may be asking why it's really necessary to create your own website, when your network marketing company already provides you with a replicated site to sell products and sign up new reps. If that's the case, make sure to go read this post on why you need your own website as a network marketer. Then come back here & create your site if you haven't yet.

Give yourself a high five, ninja! You just created your website for your network marketing business! Now it's time to create a simple design for it and start getting your valuable content out there. If you're interested in more of the best resources & tools to get your biz going & growing, check out the link below.


Pin it Now, Read it Later
How To Create A Network Marketing Blog
Source: https://mistydorman.com/start-a-network-marketing-blog/
Posted by: evansclaidecon.blogspot.com

0 Response to "How To Create A Network Marketing Blog"
Post a Comment